Depending on the amount of salt used in the cooking process, fish is divided:
- Strongly salted.
- Medium salted fish.
- Lightly salted.
The saltiest fish contains up to 14 percent salt, the average degree of salinity includes from 9 to 14 percent salt, and lightly salted fish is obtained if less than 9 percent salt is added to it.
As a rule, lightly salted fish, which can be seen on the festive table, is of particular interest. As a rule, such fish is obtained by soaking the fish, since fish is salted only with a certain amount of salt. The technology of salting fish is aimed at destroying all parasites that may be in the fish. You can’t do without a high concentration of salt here.
The problem is that it is almost impossible to buy fish prepared in this way in the store. Since fish can be stored in the store for quite a long time, it contains a lot of salt and often it is impossible to eat such fish.
If you soak it, you can achieve a delicate and pleasant taste. But there is also one “but” here. It is unknown how long the fish was stored in the store. It is quite possible that there are practically no nutrients left in it. Therefore, housewives salt fresh or frozen fish at home, after which they obtain a delicious and healthy final product by soaking the fish.
Soaking in water
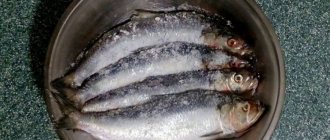
You can soak in water from 12 to 36 hours, with the exception of some herring dishes, where the soaking time reaches 3 days. It is better to change the water every three hours. After changing the water, it is better to keep the container in the refrigerator or a cool place. To remove excess salt faster, before soaking it is necessary to scale and gut the carcasses. It is more convenient to clean under water so that the scales do not fly apart. We cut large specimens lengthwise along the back and remove the spinal bone. We remove the gills immediately; for small fish it is easier to remove them along with the head.
Salting method
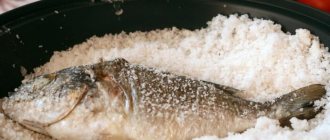
As a result of testing, I settled on the “dry” salting method without using brine: the fish is laid out in layers, each of which is sprinkled with salt.
To salt 10 kg of fish, use 1.0-1.5 kg of salt.
Salting process
If the fish was transported in hot weather, it will not hurt to quickly cool it in the freezer before salting. You can also cool the salt.
The fish is washed to remove any possible contaminants, and then, layer by layer, is placed in a plastic or enamel food container. The bottom of the container and each layer of fish is generously, but without fanaticism, sprinkled with ordinary coarse table salt without any additives.
After placing the fish in the container and salting it is completed, some kind of “lid” is placed on top (a plastic cutting board works for me). A small weight is placed on the lid so that after the salty brine is released, the fish does not begin to float.
Then the fish goes into the refrigerator. If you salt in the cellar, you need to proceed from the maximum amount of salt (1.5 kg per 10 kg of fish).
Salting time
Many people recommend salting small fish for 1-2 days, medium fish for 3-4 days, and large fish for 5-7 days. Indeed, this can be done if you are sure that the fish is healthy.
at least two weeks for salting.
.
From experience I can say that even a 3-4 month stay of fish in brine does not worsen its taste if the soaking time was chosen correctly. The final amount of salt in dried fish does not depend on the salting time, but on the time allotted for soaking.
Soaking the fish
After salting, the fish is soaked in a container whose volume is several times larger than the volume of the fish.
Before soaking, the fish must be washed to remove any remaining salt, mucus, etc.
The time for soaking fish after salting is approximately the same number of hours as the number of days it was in brine, but rarely more than a day.
If, for example, the fish has been salted for 14 days, then it needs to be soaked for 14 hours, in running or changed water from time to time. When soaking for a long time in hot weather, it is advisable to add ice to the water or place bottles of frozen water.
If the fish's spine begins to make a "crunch" sound when it is stretched longitudinally, soaking can be completed. A sign of not fully soaked fish will be the formation of a crystalline coating of salt during the drying process.
Drying fish
As you know, it is best to hang fish for drying in a cool, ventilated place and preferably do this at night. Personally, I hang the fish by the tail, as I think it is more correct.
In this case, care must be taken to protect the fish from flies. To do this, you can use both homemade devices and ready-made mesh fish dryers, which can be found in fishing stores.
Fish such as bleak dry for less than a day, medium-sized roach - 2 days, 3-4 days for larger fish. In any case, the condition of the fish must be monitored, preventing it from drying out. It is easy to get dried fish from dried fish, but not vice versa.
Rules and optimal cooking time for soaked beans
How long to cook soaked beans? It depends on the variety, the size of the seeds and the dish you want to cook.
We recommend: How to tell if meat has gone bad: 3 sure signs
If you plan to use medium-sized white beans as a side dish or add them to a vegetable salad, cook them for 45–50 minutes. And the red one needs to be kept on the stove for 60–90 minutes. To prepare the soup, the time can be reduced slightly.
Observe the following rules:
- Immediately before cooking, rinse the beans twice under running water.
- The ratio of seeds and water is 1:3 or 1:4.
- After boiling, drain the liquid, add new liquid and reduce the heat.
- Do not stir the beans while cooking and do not cover the pan with a lid.
- To reduce foaming, add 1 tablespoon of sunflower oil to the water.
- Make sure that the water does not boil away. The liquid should always cover the seeds. Add hot boiled water as needed.
- Salt the dish, add lemon juice and spices only at the end of cooking. Otherwise the beans will turn out tough.
How to check if the seeds still need to be cooked? Remove 3 beans from the pan and taste. If any of them are hard, wait another 5-7 minutes and check again.
Preparation before soaking
After collection, you should carefully examine the mushroom caps. It is in them that insects and slugs hide. Also, all rotten and damaged copies must be removed.
Important! You should not collect old and overripe valui. Even with prolonged soaking and boiling, they can cause poisoning.
The entire harvested crop must be cleaned of large debris, dry remove the bitter skin from the cap and only then rinse in water. Remove the stem completely (leave no more than 5 mm from the cap) and cut each mushroom in half to eliminate wormy specimens.
Why soak beans before cooking?
Many housewives soak beans to make them cook faster. So, red must be cooked for at least 4 hours. And if you prepare it in advance, the time will be reduced by 3 times. But there are other reasons why soaking legumes is beneficial.
- Improved taste
If the seeds are not pre-soaked, the shell will not cook completely and will be slightly bitter. The density will be uneven: some grains will remain solid, while others will turn into puree. But after cooking, soaked beans become soft, tender and aromatic.
- Prevention of gas formation
Many people didn't like pea or bean soup as children because of the known side effects. The reason is that legumes contain oligosaccharides. The human body is not able to completely break down and absorb them. As a result, undigested oligosaccharides enter the intestines, where they begin to ferment.
Legumes are soaked to break down these substances. Then after eating bean soup you will feel lightness and not rumbling in your stomach.
- Preservation of vitamins
Beans are rich in vitamins B1, B4, B5, B6, PP, and folic acid. However, with prolonged heat treatment, the beneficial substances decompose. Since the soaked seeds are cooked for less than an hour, some of the vitamins can be preserved.
- Neutralization of harmful substances
They are also called antinutrients. Beans contain phytic acid. This substance protects the beans from sprouting. But when it enters the body, phytic acid binds molecules of zinc, iron, copper, silicon and other trace elements. It turns out that when eating unprepared beans, minerals pass through the stomach and intestines in transit. In essence, you are eating an “empty” product.
Beans also contain lectin, which damages the mucous membrane of the gastrointestinal tract and provokes inflammatory processes. The risk of colitis, Crohn's disease, leaky gut syndrome and other digestive problems increases. Soaking partially deactivates the lectin.
- Increased digestibility
Legume seeds contain digestive enzyme inhibitors. They prevent the body from properly digesting proteins, so the pancreas works twice as hard. If you soak the beans before cooking, nothing will interfere with the digestive enzymes, which means the dish will be better digested.
We recommend: Mystery of the century: what are the slots in a bottle of oil for?
Vegetable soup with beans recipe
One of the healthiest legume dishes is bean soup. To prepare it you will need the following products:
- soaked beans – 500 grams;
- potatoes - 3 pieces;
- rice - 0.25 cups;
- carrot – 1 piece;
- flour – 1 tablespoon;
- vegetable oil - for frying;
- salt and spices;
- greenery.
Soak the rice for 3-4 hours, then rinse. Boil the prepared beans for 40 minutes. Cut the potatoes into cubes and grate the carrots on a coarse grater. Fill all ingredients, except carrots, with one and a half liters of water and place on the stove. Bring to a boil and cook for 20 minutes over medium heat.
Sprinkle the carrots with flour and lightly fry in vegetable oil. Add roast, spices and salt to the soup. Turn the heat to low and wait another 10 minutes. Finely chop the greens, place in the pan and cook the soup for another 3 minutes.
Video below - learn about the two ways to soak beans and how they differ from each other.
Soaking beans is a simple procedure that will require minimal effort from you, but will make the dish as nutritious and easy to digest as possible. Use the cold method whenever possible. Cook the beans following the rules described in the article. Then the finished dish will delight you with its softness and rich taste.
Dry pickling of cucumbers without brine
If you need to make cucumbers in a faster way, then pickle them in an ordinary plastic bag. This method allows you to achieve the desired result much faster and literally within a day after the start of the pickling process, you will be able to please your family with hard and aromatic cucumbers.
Pickling cucumbers in a bag with dill:
- Select small springy greens and rinse them in cold water
- Carefully cut each cucumber with a knife and place them in a clean bag
- Chop dill, parsley, celery, garlic and hot pepper and add it all to the cucumbers
- Salt and pepper the vegetables and herbs and tie the bag as carefully as possible
- Shake the bag vigorously, place it in a bowl and place it in the refrigerator for a day.
- Place the finished cucumbers in a hermetically sealed container and store in a cool, dark place.
Why soak cucumbers before pickling?
It is customary to soak cucumbers before harvesting. The optimal soaking time is 3 hours, no longer. Why is this being done? There are many reasons given, but they are, in my opinion, quite controversial:
- Version one is to get rid of bitterness. In fact, this may be relevant for lightly salted cucumbers; for pickling and pickling for the winter, this bitterness does not pose any threat; it never occurs in cucumbers that have been in brine for a long time.
- The second version is to get rid of harmful substances that could accumulate during growth when using fertilizers, in particular, nitrate. This interpretation does not stand up to criticism - no saltpeter will come out of cucumbers in such a short soaking time.
- The third version is to revive cucumbers that have begun to wither and dry out. Also a so-so option. Why harvest limp cucumbers?
I will express my opinion on this matter based on personal experience. By soaking I solve two significant problems. One of them is that during growth and transportation, dried plaques of remains of flowers, soil and other foreign components accompanying growth may remain on the fruits.
Soaking for 3 hours completely “steams off” all this unnecessary debris .
The second problem, and this is more important, is that cucumbers absorb liquid very well. If cucumbers that are not soaked or saturated with water are poured with brine and the jar is screwed on, then after cooling it turns out that the brine in the already closed jar is not enough, the level is missing by a couple of centimeters, and this creates empty space in the jar, which is highly undesirable if there is a calculation for long-term storage.
From the above, two main points follow: even very fresh-looking cucumbers must be soaked for better washing, and there should be as little air as possible in the jars with cucumbers. A small subtlety: during sterilization, brine is absorbed into even soaked cucumbers, so before closing the lids, you should add it “to the fullest.”
How to properly soak beans?
What water should I soak the seeds in? Clean, boiled, filtered, room temperature.
There are two methods: cold and hot. The first allows you to preserve maximum vitamins in the dish, and the second saves time.
Cold way
To properly soak beans, you need to follow these steps:
- Sort out the seeds. Throw away dry and wrinkled beans, as even after cooking they will not taste good.
- Rinse under running water.
- Place into a large saucepan. Please note that after soaking, beans increase in volume by 1.5–2 times.
- Pour cold or hot water over the beans (in the second case, the soaking time will be slightly reduced). For 1 cup of seeds, a minimum of 3 cups of liquid is required.
The optimal soaking time is 8-10 hours. You can leave the beans overnight. If you soak them during the day, change the water every 3 hours.
If you add 1 teaspoon of baking soda to the pan, the soaking time will be reduced to 6-7 hours.
Before cooking, the liquid must be drained to get rid of harmful substances. Then rinse the seeds again under running water.
Do not leave the beans to soak for longer than 12 hours. The seeds may ferment and become unfit for consumption. If your apartment is hot, put the soaked beans in the refrigerator.
Hot way
This soaking improves the taste and allows you to cook the beans quickly. The procedure is as follows:
- Pour hot water over the seeds until it completely covers them.
- Place the container on the fire and bring the liquid to a boil.
- Boil for 2-3 minutes.
- Remove from heat, cover and leave for 1 hour.
The beans are now ready for cooking. However, antinutrients and digestive enzyme inhibitors remain in the seeds.