Needlewomen strive to capture the bright natural colors in their creative works. The symbol of autumn compositions is often the rowan tree.
The intense combination of its green leaves and red-orange berries is used in products as decoration or as a whole composition.
At the same time, a rowan branch is made with your own hands in absolutely different variations, depending on the purpose of the product.
A bright beaded topiary is perfect as an interior item. Colorful work will bring a fresh touch to a dull room. The work is quite labor-intensive, but you can master it by following the step-by-step instructions.
candy tree
Due to the light shine of the beads, the tree acquires the effect of a varnish coating. In this case, the reflection is associated with the natural phenomenon of wet foliage, which is observed on trees in rainy autumn.
The product consists of several rowan branches. Therefore, having dealt with one element of the tree, you can create a whole composition in a similar way.
Involved in weaving:
- Czech beads No. 10 green and orange;
- copper and green wire;
- brown ribbon;
- brown acrylic paint;
- gypsum.
Beads are strung on copper wire 10-12 cm long and twisted. You should start working by moving the bead to one end of the wire.
Read this: Felting: What is it and how to create colorful jewelry
After 5 mm from the first bead, the second one is strung and twisted again.
The entire row of beads continues along the length of the wire in a similar manner. A rowan bunch requires about 15 beads.
The ends of the wire are twisted together to form an inflorescence.
In order to make a full-fledged bunch, you should prepare 5 such inflorescences.
The inflorescences are connected into a single piece by twisting the wire. When the rowan bunches are ready, work moves on to the leaves.
Beads of the corresponding color are strung on a green wire 10 cm long.
It is located in the center of the segment. One of the ends of the wire passes through the bead again and the wire is tightened. The next two beads are threaded in the same way, then three, then four.
After this, the number of beads decreases one by one until there is only one bead left in the row. Then the ends of the wire are twisted.
Several leaves of beads are made, after which a single branch is formed. In this case, the rest are screwed perpendicularly to one leaf.
When the required number of branches from leaves and berry clusters has been prepared, the random formation of rowan branches begins. In this case, the clusters and leaves are twisted together in the desired order.
Read this: Twisting: Beginner Patterns to Learn the Technique Quickly
To create a tree, you should take part of the modeling mass and roll it into a column. You need to insert prepared rowan branches into it one by one.
- After the mass has dried, the tree trunk is wrapped with brown tape, as in the photo.
- The tree is inserted into a small flower pot and filled with plaster.
- When the plaster dries, it should be painted brown.
Plasticine berries
The rowan branch also inspires little creators. Often it acts as a craft for the autumn holiday. As a rule, plasticine is involved in such work.
To create a rowan branch from plasticine, you should stock up on material in the appropriate colors and a base in the form of a cardboard sheet.
Brown plasticine branches are formed and randomly attached to the base.
Small balls are rolled out of red-orange plasticine, each of which is equipped with a black or brown center characteristic of berries. The balls are arranged on the base in the form of a cluster.
- Cuts are made on each core to give the berries a natural appearance.
- Alternately, natural veins are drawn on the leaves.
- The craft is ready!
Leaves are formed from green and orange plasticine. They are located along the prepared branches.
Read this: Wood burning: a master class with step-by-step instructions
Autumn in knitting
Rowan motifs can also be seen in knitted items. As a decoration for your headdress, you can create an original element in the form of a rowan branch crocheted.
After yarn over, the hook is pulled through three loops at once. Then yarn over again and cast off the next three stitches.
- And so on until one loop remains.
The work is turning around. Half-loops are formed along the entire row, after which they are closed three at a time.
This is how all the leaves are done. The berries begin with four air loops closed into a ring.
Single crochets are made in a circle through the central ring.
The rows do not close during operation. You should get a dense berry.
The product is turned on the wrong side. The wrong side will be the front side of the work.
- The blanks are fixed to the main product in parts or after preliminary assembly.
Video on the topic of the article
Rowan from foamiran: rowan leaf with berries
Golden autumn has arrived and I want to capture its beauty. One of the most beautiful and picturesque trees can be called rowan. In autumn it transforms, the berries fill with color, and the foliage turns bright colors.
In this master class I will show you how to make a rowan leaf from foamiran in two ways. We will collect a whole sprig of rowan and make rowan berries from foamiran.
This product can be used to create colorful autumn compositions, bouquets and brooches (if the pattern is reduced in size).
- These are the twigs with rowan berries we will make at the master class.
- master class:
- To create autumn rowan leaves from foamiran you will need:
- green, olive, yellow, orange, red Iranian foamiran;
- foil;
- acrylic paint red, yellow, black, green, brown, green and a sponge for shading;
- second glue;
- oil pastels yellow, orange, green, red;
- floral wire No. 28-30 brown;
- brown tape.
According to the pattern, we cut out leaves in the form of droplets from green and olive foamiran. Cut out small teeth on all droplets.
Take acrylic paint and apply it with a sponge. We apply the tint on both sides and in various ways, use our imagination or take a living sheet and copy it onto foamiran.
We take the leaves, fold them in half and stretch them out, heat the edges of the leaves at the end of the iron and make waves on the leaves.
We take wire No. 28-30 brown and cut it 8-6 cm long and glue each leaf. We glue the smallest leaves onto 8 cm wire. Take a skewer and apply the veins of the leaves.
We take the brown tape and cut it in half lengthwise and begin assembling the rowan leaves. We begin to screw the leaves in pairs according to size onto the wire with a small leaf.
Having collected several rowan leaves, we begin to collect the twig by attaching one leaf to another with brown tape. This is the rowan branch we collected using the first method.
Method 2 for making a rowan sprig from foamiran: MK
These are the rowan leaves we make using the second method.
According to the pattern, we cut out droplets from different colored foamiran. Cut out the cloves throughout the droplet. Using a stick we apply veins on the leaves. We process it with an iron, making waves on the leaves, giving life to the leaves.
We take 10 cm floral wire and start assembling the leaves directly on it. Gluing one leaf at a time in pairs, gluing them with their legs. Place one leaf from below, the second from above towards the main wire of the leaf.
DIY rowan berries from foamiran
We take brown floral wire No. 28-30, cut it into 6-8 cm pieces. And make loops at the end of the wire.
- We take the foil and cut it into pieces 6*6 cm - 8-12 pieces and make balls from the squares for the base of the rowan berries.
We make holes at the base of the balls and glue the wire. In the upper part of the ball we make 1 mm dimples using something blunt.
We take red foamiran and cut it into 3*3 cm squares and put it on a wire with balls.
Place a square on the iron at silk-wool temperature and wrap around the foil ball. We twist the tail well and then glue the foamiran and cut off the excess tail. Warm it well and rub all the folds.
Take acrylic black paint and use a toothpick to draw a star on the tip of the berry. We collect the berries all together with tape.
Assembling a composition from a rowan leaf, twig and berries
These are the two rowan branches with berries we made today at the master class. For instructions on making other autumn crafts with your own hands, see MK Autumn leaves from foamiran.
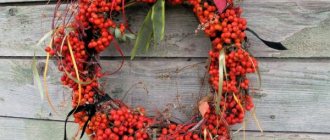
Rowan for decorating autumn compositions
Rowan berries will perfectly complement the autumn composition for kindergarten.
Rowan in an autumn composition of vegetables
Rowan can be used to complement various people and animals made from natural materials.
People and animals made from natural materials
Rowan berries can be used to decorate an autumn leaf topiary.
Rowan in autumn topiary
How to make a rowan from beads with your own hands according to diagrams with videos and photos
Rating: 5/5 (1)
The art of beading allows every woman to find her own style note. Working with beads is fascinating, and a wide selection of materials allows you to bring to life original ideas for creating bead products. Wicker jewelry - brooches, bracelets, necklaces, beaded lariats - can become a unique gift for loved ones.
If you are just learning the basics of bead weaving, you are probably thinking about what you can make from beads. We invite you to make a very easy-to-work tree - rowan. It amazes with its beauty and ease of manufacture .
Where weaving begins and how to properly make rowan from beads with your own hands, read our article.
How to do it right
Watch our master classes with step-by-step photos and you will find out what materials and tools you will need to create a rowan tree from beads.
Our detailed master class with step-by-step photos will help you make a rowan branch from beads. To work, prepare small green beads and large red ones, scissors, wire and floral tape.
- Place 3 beads on a 70 cm long wire.
- Pull either end of the wire through any 2 beads and tighten the loop.
- Collect 3 more beads and tighten with the end of another wire.
- Make another loop as well.
- Tighten the next loop using 2 beads.
- Next, take 1 bead and tighten the loop with the end of the other wire.
- Pass 12 beads through one wire - let's call it a working wire - and separate 3 beads from the edge.
- Pass the end of the working wire through the 3rd bead, then through the 2nd and tighten.
- Leave a space of 1 cm between the formed loop and the strung beads.
- Separate 3 more beads and pass the wire through beads No. 6, No. 5 and No. 4. Tighten the loop.
- Repeat with the next 3 beads.
- Pass the end of the wire through 2 beads and tighten, then through one.
- Now take the end of the wire that you used to tighten the loops and add 12 more beads. Make leaves using the same pattern. In total, there should be 7 beaded rowan leaves on the branch. Such loops are used when weaving tops for “beaded snowflakes.”
- Now proceed to weaving a bunch of rowan berries from red beads. Pass one end of the wire through the bead and twist it at the base.
- Place the next bead on either end of the wire and twist the wire.
- So make a bunch of several beads.
- Screw wicker branches with leaves to the resulting bunch.
- Wrap the bottom of the branch with floral tape.
- After you have made several branches, wrap them around flexible thick wire and form branches. This is how beautiful it should turn out.
Autumn sprig of rowan from beads
To weave an autumn branch of rowan, you will need green beads of different shades (or add yellow beads to the weaving), red beads and wire.
- Weave the branches according to the pattern, collecting beads in random order. This weaving method is used to make many beaded animals. How to make a small craft in the shape of a dog from beads with your own hands, see here.
- Pass the wire through 1 bead and move it to the middle. Then put 2 more beads on either end of the wire and pass the other end of the wire through these beads. Tighten the wire.
- Next, collect 3 beads through one end of the wire and pass the second end of the wire through them. Place and tighten the next 4 beads in the same way.
- We finish weaving the rowan leaf, reducing the beads in each row.
- Make the desired number of leaves and twist them into a twig.
- Make the required number of clusters from red beads or beads.
- Form a rowan branch from several branches with leaves and “berries”, wrap with floral tape. By using different shades of green beads or splashes of yellow, a realistic autumn rowan leaf is obtained.
Winter branch of rowan from beads
In winter, rowan loses its leaves, leaving behind ripe berries, so weaving such a tree from beads is very easy. White and silver beads are suitable, as well as orange beads for “berries”.
- Mix the beads for “snow” and place them in random order on the wire.
- Form a loop of 10 beads and twist. Make another one nearby. In order to generously cover the bunch with “snow”, make 8 loops. Make the required number of such branches, leaving 6 cm wire tails.
- Using the same principle, make bunches of rowan berries from orange beads.
Wrap the resulting bunches in “snow” and twist. Wrap with brown floral tape. The sprig of winter rowan is ready.
Rowan beads
In our master class we will show you how to assemble rowan from beads. To make it you will need green beads and larger red ones, 0.3 mm thick wire, green floss threads, alabaster, glue and a stand for the tree.
Green twigs
Measure 60 cm of wire and thread 9 green beads through the middle. Twist the loop. Back off about 5 mm and twist 9 beads into a loop. Weave a total of 6 loops on each side.
- Make the required number of branches.
Leaves for beaded birch (which can also be woven in the autumn version) and beaded wisteria are woven in a similar way.
Red bunches of rowan
- Place 1 bead on the wire, stretch it to the edge and secure the “berry” by twisting 1 cm of the wire. Then thread 1 more bead and twist.
- Make about 10 of these loops with “berries”.
- Make rowan bunches half the number of branches.
Making twigs
- Wrap a bunch of rowan berries with green floss threads. Attach the finished green twig, twist the ends of the wire and wrap it around it as well. Add another branch. Make indents of about 5 mm between branches.
- Form future branches at your discretion.
Making side trunks
- Screw the finished branches to a thick wire and wrap them with threads.
Forming the main trunk of the tree
- Connect the side trunks and wrap them with thread. Mix PVA glue with alabaster. Apply the solution to the trunks with a brush. Fill the bottom of the tree with a solution of glue and water and let dry.
- When the tree is dry, paint the trunk with brown paint.
- Paint the bottom of the tree with green paint.
Winter rowan from beads
The rich red berries of rowan berries look especially beautiful under a layer of snow. Let's weave a rowan tree from beads in the snow with our own hands. Prepare silver or white beads, red beads (or large red beads) and wire.
- Let's make grapes. Place a red bead on the wire and make a 1 cm twist. Thus, make the required number of “berries”.
- Now we create “snow” on the grapes. Make a loop of 8 silver beads and twist into a loop. Also make 2 loops on each side. Framing the bead with “snow”, twist the parts.
- Make the required number of snow-covered bunches and screw them to thick wire. Wrap with brown thread. Fold the edges of the branches downwards.
- Make a solution of water and alabaster and fill the tree. After the solution has dried, dilute the alabaster with water and PVA glue and apply it with a brush to the trunk and branches.
- When the rowan has dried, paint it with brown gouache and varnish it. An artificial snowball can be made from a mixture of water, white gouache, alabaster and glue. This winter beauty will undoubtedly become the pearl of your collection.
Video with master class lessons
We have prepared for you several video tutorials on how to create a rowan tree with your own hands.
- For a master class on weaving winter rowan bunches from beads, watch this video. To work you will need wire, large red beads, a mixture of white and silver beads.
- The lesson from our video will show you how to make rowan from beads with your own hands. The clusters are woven from black beads and beige beads.
- Weave an unusual autumn chokeberry with your own hands using the following video tutorial. See the stages of making tree branches and clusters.
Bright beaded rowan will be a wonderful gift or home decoration. Share your work and skills with our readers.
DIY rowan branch
In autumn, nature is full of bright colors, which makes anyone incredibly happy. Every autumn there are several bright days, when the sun is still warm, the leaves are glowing with red-orange colors, and the mountain ash is waving its red tassels. Today we will talk about how to make a rowan branch quickly and easily with your own hands.
We sculpt a rowan branch with our own hands from plasticine in MK
Plasticine is an excellent material for modeling enthusiasts. Children especially love to sculpt something from plasticine. Making a rowan brush from plasticine with your own hands is very simple; for this we need very little material:
- Plasticine black, black, orange, green, brown;
- Scalpel or plasticine knife;
- Modeling board;
Instead of a board, the basis can be a sheet of colored cardboard.
You need to take a piece of brown plasticine and roll it into a rod of arbitrary length, up to half a centimeter thick, this will be the basis for the twig.
We cut the workpiece into any number of branches and branches, you can make 2-4 pieces, on one side we make an end converging into a thin line. Then we mold the blanks in the shape of a twig onto the base.
Let's start sculpting rowan berries. We tear the orange plasticine into small pieces and roll into pea-sized balls, about 10 pieces. You need to glue a small black or brown dot to each berry. To make the berries look like real ones, you need to make small cuts or scratches at each point.
We sculpt the leaves from green and yellow plasticine, you can also add a few orange ones. The leaves should not be too large; after you cut out several leaves from a block of plasticine, you should give them a design; this can be done perfectly with a toothpick
The finished composition should be similar to the one shown in the photo.
Crochet rowan with diagrams and job description
I would like to share a diagram of a rowan brush for a crochet hook.
The leaf is knitted according to this pattern.
The second side of the leaf is also ready.
There is also a scheme for berries:
By making several berries and leaves in this way, you can form a crocheted composition.
Let's look at another simple option - a sprig of rowan from beads
For lovers of bead weaving, there is also an option for a rowan branch.
For this we need small green beads, cutting, red-pink beads, brown beads, cutting. We will weave on a base of copper wire.
The first step is to make a rowan tassel. To do this, we collect branches of any length brown, and at the tip a red-pink bead is secured with a brown bead. You need to make about 12 of these berries. Several rowan trees can be attached to one branch.
- Next we weave the leaves in the following pattern of 23 rows.
- 2-4. 2 pieces each;
- 5-7. 3 pieces each;
- 8-10. 4 pieces each;
- 11-13. 5 pieces each;
- 14-16. 4 pieces each;
- 17-19. 3 pieces each;
- 20-22. 2 pieces;
Each branch has 13 leaves. The general view of the composition is shown in the photo.
We learned how to make a rowan sprig using three different needlework techniques. As you can see, this is not difficult to do. This craft will be a rather colorful decoration for your room. We also invite you to watch a short video collection on how to make a sprig of rowan quickly and easily with your own hands