- November 10, 2018
- Crafts
- Kira Ifeevskaya
Creativity is always useful for the development of children's thinking; when working with materials, fine motor skills, imagination, and accuracy develop. Also an important factor will be the communication between parents and children while creating crafts. Often in schools and kindergartens they are asked to make products from natural materials for the autumn holiday. An excellent option would be to make a craft from red rowan and autumn leaves.
Often in a city, and especially in a metropolis, a child has little opportunity to communicate with nature. And the joint activity of parents and children to create crafts will contribute to this. After all, in order to start work, you need to find, collect and process material. To do this, you need to go to the nearest park or forest.
When to collect leaves and rowan?
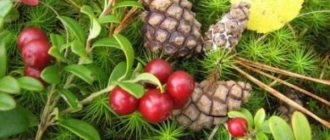
It is important to choose the right time to prepare beautiful material. If the time to collect leaves comes only at the end of September - beginning of October, then rowan berries should be harvested from the end of August. This is when you will find beautiful, glossy, firm berries. They are perfect for children's creativity. Too ripe fruits are not used. Because the berries become soft and with any awkward movement they burst and stain everything around. Working with them is difficult even for an adult. What can we say about the child? Prepare enough material for future crafts so that the child can choose which branch he likes best and will fit better into the composition.
Rowan under the snow
Externally, this craft looks more interesting. But to make it you will have to make the snow yourself from beads. Painting the branches in this case will not give the desired effect.
To make snow, you need to use loop weaving technology, which is not too complicated, so it is suitable for beginners:
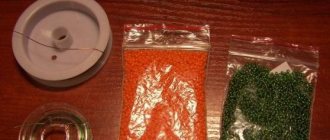
- You need to collect beads on a white wire and make a loop. It is better to use white beads, but they can also be replaced with transparent glass beads;
- Next you need to twist exactly two turns;
- Another loop should be made near the twist.
Please note that the length of one piece of wire used should be enough for at least 6-7 loops. You cannot make too few loops, because in this case the “snow” will not cover the fruit.
Tips for craftswomen
So, you have collected the required amount of material. How to preserve red rowan for crafts? Rowan should not be washed. This way it will deteriorate faster. Free it from large branches and leaves. Before completely peeling the berries, decide what kind of craft can be made from red rowan? If you make a herbarium and glue it onto cardboard, it is better to completely clear the berries from the branches. This cleaning method is also suitable for making rowan beads. If you decide to make a topiary or a bouquet of autumn gifts, then leave the rowan tassels intact.
How to choose wire thickness?
At the beginning of work, it is difficult for every master to decide exactly what thickness the wire should have. How convenient it will be for the master to work with it depends on the correct choice in this case. There is one rule, guided by which you can make the right choice. It is necessary to choose a wire of such thickness that it easily passes through the beads. If the wire passes through the beads at least 2 times, then it is suitable for work.
How to save materials for crafts?
Before we move on to the description of the red rowan crafts themselves for kindergarten, we need to say a few words about how to preserve the accompanying material. For a complete craft - autumn leaves. Once you have collected them, you need to keep them in the same condition. The fact is that as soon as the leaves get into a dry room, they immediately begin to dry. And when working, they crumble and curl very much. To avoid this effect, you need to put them between the pages of books for several days. This will give them an even shape and make them easy to work with. This method requires a certain amount of time. Therefore, it is best to dry the leaves with an iron. Set the iron to medium heat, take two rags or pieces of paper, place the leaves between them and start ironing. In just a few minutes they will be ready for use.
Now that all the materials are ready, you can consider several options for crafts made from red rowan and leaves.
Materials for work
Rowan is a tree that looks quite bright due to the color of its fruits. And therefore, usually there are no problems with choosing the appropriate color of beads. However, it is recommended to work exclusively with high-quality material that has a rich color. Especially when it comes to choosing the color of the fruit. It should be bright red.
To make the leaves look like real ones, it is not enough just to use a certain pattern. The choice of color also plays an important role here. It is better to refuse to buy dull glass beads and pay attention to beads that have a bright green color.
Wire
This is one of the main materials you will need for work. In this case, you will have to work with wire. Because it is able to provide the necessary flexibility and fixation of all elements of the craft. After all, beaded rowan branches must retain a certain mobility, but at the same time keep their shape.
Threads, tapes, PVA glue
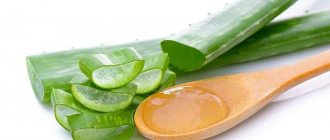
You need to use not ordinary satin, but floral ribbons. They will help you create the desired composition. In addition, the work will also require green threads, with which you can securely fasten all the moving elements. Glue is also useful for the same purpose. Preference should be given to high-quality products that provide reliable fastening.
Paints and varnish
Not all wood elements are created from beads. For example, the barrel is made from scrap materials. To make it look as much like the real thing as possible, you will have to use paints. For the greatest contrast of colors, the trunk is sometimes painted white.
Then the beaded rowan tree looks even more impressive. Apply the paint with a thin brush, which also needs to be purchased in advance.
Varnish is used to consolidate the results of the work and highlight certain elements. You can use both glossy and matte varnish. Both options are great for the job.
Alabaster and plaster
Craftsmen successfully use both of these materials to make the base. The quantity must be calculated in advance. It all depends on how large a mold the artist is going to use to ensure the stability of the craft.
Rowan beads. What to do and how to do it correctly?
This craft is perfect for making together by mother and daughter. To make beads, in addition to rowan, you will need: thread (it is better to take a strong one, something like silk), a large needle and scissors. A few tips about the thread. Choose its color based on a shade similar to the berries. When, over time, the rowan begins to lose moisture and decrease in volume, the thread may be visible. And it won't look very nice. Immediately take a piece of thread larger than needed. It is better to cut off the excess at the end rather than tying new pieces to an unfinished product. If you are preparing a craft for the garden, and your mother’s assistant is still very young, then you should not trust the stringing process to a child. Because it happens with a needle. This means that the child may be injured. Just trust the girl to serve the berries or select the most beautiful ones. The process of collecting berries into beads is a very painstaking task. When placing it on the needle, you should try not to damage the berries. To do this, insert the needle only along the direction of the cutting.
Plant more berries right away. Then leave the rowan craft to dry for several days. After some time, the berries will become smaller due to lost moisture. Then the beads will have to be tightened, and accordingly their length will decrease. This decoration can be functional and will go perfectly with an outfit for an autumn garden party. You will see, made by joint efforts, the girl will like this craft. And soon she will want to repeat it herself for her toys.
Options for making crafts
Of course, there are several different technologies that involve creating very unusual crafts. You can use different techniques. It all depends on the size and shape of the product, as well as on your imagination.
The appearance of crafts may differ depending on which tree the master decided to take as a basis:
- winter rowan - sometimes the leaves of this craft are made exclusively from silver beads. And then the tree looks snow-covered, and therefore especially beautiful. In some cases, leaves are made not only from silver, but also from white and green bugles;
- chokeberry - looks even more impressive thanks to its bright color, which will combine beautifully with other shades in the interior. And therefore, such crafts are often made to order even for owners of apartments with a modern interior.
The master must independently decide what kind of look to give to the craft. However, you need to remember to follow one rule: the craft should look like a real tree. This can only be achieved if the color of the glass beads is chosen correctly.
Topiary made of rowan and leaves
Topiary is a tree that, according to Eastern religion, brings happiness to the home. This DIY red rowan craft is perfect for kindergarten and first grade at school. Mothers of boys can also make it together with their assistants. This work will involve not only rowan berries, but also other natural materials. So, you will need colorful autumn leaves, pine cones, acorns, and tree branches. Let's start making crafts from rowan. To work, you will also need an unnecessary flower pot or glass. A plastic one is best to avoid the risk of broken glass, especially since glass is very heavy. Place crumpled paper or cardboard in a glass or pot and secure with a glue gun. Then we take a dry branch and glue it to the contents of the glass or to its bottom. To prepare the crown itself, roll a ball out of paper or make it out of cardboard. We cut a small hole and put the ball on a dry branch. We fix everything with glue. After that, we move on to the most interesting part – the decor. You can place moss and small leaves in a glass, thereby imitating earth. And on the ball itself you need to glue acorns, leaves and rowan berries.
How to glue rowan to cardboard? To do this, completely separate the berries from the branch. Pour a little glue onto the ball and place the berry with the stem facing up. This method is one of the most accurate and successful. The berries must be glued very tightly so that there is no free space left, and they will also need to be diluted with leaves.
DIY rowan branch. Master class with step-by-step photos
A sprig of rowan from modeling mass and foamiran.
Master class Author: Tatyana Sergeevna Kolesnikova, labor education teacher, State Educational Institution of the Republic of Kazakhstan boarding school of the 5th type, Zernograd. Purpose: a sprig of rowan can be used as a gift. Age: the master class is intended for high school students, parents, and additional education teachers. Objectives: - To introduce students to a new material - foamiran, and methods of processing it. — Develop children's creative abilities, fine motor skills, imagination, accuracy. - Cultivate aesthetic taste.
According to the folk calendar, the autumn of Peter and Paul marks the end of Indian summer and the beginning of real autumn. And on this day the rowan tree has a name day. In the old days, she was affectionately called Ryabika and was planted near the porch to protect the house from “dashing people and bad news.” And although the rowan is a short, fragile tree, it is not afraid of drought or frost and lives and bears fruit for about 100 years. So, if you see a rowan tree, pick a tassel and hang it in your house for good luck. And how delicious this scarlet berry is! Rowan is a genus of deciduous, frost-resistant shrubs and trees of the Rosaceae family. The botanical name of mountain ash is Sorbus aucuparia, the generic name comes from the Celtic word “sor”, which means “tart”, and the species name comes from the Latin “aucupari”, translated “to catch birds”. It seems that the name came from birds feasting on rowan fruits. There are more than 100 species of rowan in the world (according to some estimates, almost two hundred), with about a third of the species growing in the countries of the former USSR. Rowan is widespread not only in Russia, Ukraine and Belarus, but throughout Europe and Asia, as well as in North America. Legend of the Rowan One day, the daughter of a rich merchant fell in love with a simple guy, but her parents did not want to hear about the poor groom. To save his family from shame, he decided to resort to the help of a sorcerer. His daughter accidentally found out about this and the girl decided to run away from her home. On a dark and rainy night, she hurried to the river bank to the meeting place with her beloved. At the same hour the sorcerer also left the house. But the guy noticed the sorcerer. In order to take the danger away from the girl, the brave young man rushed into the water. The sorcerer waited until he swam across the river and waved his magic staff when the young man was already climbing out to the shore. Then lightning flashed, thunder struck, and the guy turned into an oak tree. All this happened in front of the girl, who was a little late to the meeting place because of the rain. And the girl also remained standing on the shore. Her slender figure became the trunk of a rowan tree, and her arms—branches—stretched out towards her beloved. In the spring she puts on a white outfit, and in the fall she sheds red tears into the water, sad that “the river is wide, you cannot cross, the river is deep, but you cannot drown.” So there are two lonely trees standing on different banks, loving each other. And “it’s impossible for a rowan tree to move to an oak tree; apparently, an orphan’s eyelids can swing alone.” This is such a beautiful and sad legend. Necessary materials and tools: * modeling mass, * lemon or yellow foamiran, * wire, * dry red and green pastels, * wet wipes, * "Second" glue, PVA glue, * orange, red gouache, * brown strip corrugated paper.
Progress:
1. Roll a ball from modeling mass; it can be replaced with polymer clay. Cut a wire 5 cm long, bend the edge into a loop. Pass the wire through the ball. Prepare 10-15 of these berries. Leave to dry for a day.
2. Paint each berry with a mixture: orange + red gouache + PVA glue. (PVA glue creates a thin protective film so as not to stain your hands)
Then coat each berry with acrylic gloss varnish. This varnish does not have a strong odor, gives a beautiful gloss, so even children can use it.
These are such beautiful berries. I like to do a lot at once, so to speak “just in case”
Take a berry and draw a “6-pointed snowflake”
Combine the berries to make a twig.
3. Let's start making leaves and twigs. Take lemon or yellow foamiran. Cut out 5-7 leaves from it, make a carved leaf.
I have lemon foamiran, but it looks white in the photo... 4. Prepare a damp cloth and dry pastel.
5.Wrap your index finger with a damp cloth, rub the pastel and start painting the leaf.
The leaves can be one color or two colors.
6. Draw the veins with a felt-tip pen.
7.Take any “super glue”, pour a little of it onto the cardboard, take the wire, dip it in the glue and attach it to the back of the leaf.
8. Connect the leaves to make a twig.
9. Connect a sprig of berries and a sprig of leaves together.
10. Wrap the wire in brown crepe paper.
11. Tie a beautiful bow. The rowan sprig is ready.
I look forward to your wishes, questions and comments. Thank you for your attention. I wish you creative success!
We recommend watching:
DIY autumn bouquet made from natural material for children. Master class with step-by-step photos DIY autumn crafts for children 5-8 years old. Hedgehogs in the autumn forest Do-it-yourself viburnum branch from foamiran. Master class with step-by-step photos Birds - a magnet made of terry foamiran with your own hands. Patterns. Master class with step-by-step photos
Similar articles:
Master Class. DIY foamiran flowers
Garland of leaves and berries
Another craft from rowan that will be easy to make is an autumn garland. For this you will need colored paper. From it you need to cut out multi-colored confetti that matches the color scheme. Take a long thread, we also recommend choosing a durable material, and using a needle, begin to thread confetti, dry leaves and rowan berries onto it. You do everything in a chaotic order, following your imagination. After everything is collected on the thread, secure the ends with a knot and hang this autumn garland on the window. Or decorate your doorway with it. Moreover, such a craft made from rowan can be hung either horizontally, one or several, hung vertically, thus making a curtain for a window or door. This kind of creative work is more suitable for younger children, since it does not have any particular difficulties. You can admire such a garland at home until the onset of cold weather.
Examples of ready-made children's crafts
Ready-made children's crafts amaze with their variety and imagination; each work is creative and original in its own way.
Making crafts with your own hands from rowan leaves and berries is an ideal option for developing children’s motor skills, imagination, thinking, and creative skills. Any loved one will be happy to receive an original, bright yellow-red applique or craft. Such products will lift your spirits, complement the stylization of a themed holiday, and become an effective decor in the interior of the rooms.
Herbarium
You will need: a thick book, autumn leaves, an album for dried plants.
Master Class
- Collect fallen leaves.
- Flatten each piece of paper and place it between the pages of the book.
- Close the book and leave it closed for 2 weeks so that the leaves dry thoroughly.
- Carefully remove the leaves from the book, as dry leaves are fragile material.
- Place the leaves on the pages of the album and sign their name.
- Store the album in a bright, dry place.
The herbarium is ready!
Skeleton leaves
You will need: fresh leaves, food coloring, soda, toothbrush, napkins, saucepan.
Master Class
- Pour a tablespoon of baking soda into a saucepan and add 4 tablespoons of water.
- Mix this solution well.
- Place the leaves in a saucepan.
- Boil for 30 minutes over low heat.
- Place the leaves with the glossy side on top.
- Blot the leaves with a napkin.
- Scrub the pulp of the leaves with a toothbrush.
- Rinse the leaves under water.
- Prepare a solution with food coloring.
- Place the leaves in the dye.
- Remove and dry the leaves.
Skeleton leaves are ready! I recommend watching the video master class!
Compositions from autumn materials
Multi-layer wreath with dry lavender, greenery, apples and decorative pumpkins
A bouquet without flowers - from pine cones and more. Yes, imagine, this happens, isn’t it, it’s just magic.
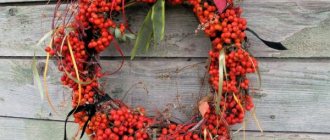
Simple compositions from rowan fruits are a decoration not only for the garden, but also for the home.
A candlestick made from natural materials will add a special romantic mood and comfort.
An extraordinary approach to decorating your home and creating an autumn composition. Let's take note.
An amazing riot of colors!
A couple more original ideas for a wreath on the door!
You don't have to be a florist to create compositional masterpieces. The main thing is to show your imagination!
Pumpkin is an ideal fruit for creating autumn bouquets.
If you are not in the mood to make something, but the desire for a drop of autumn to appear at home exists, take a walk along the street and simply collect the gifts of nature. Pick a couple of autumn leaves, a branch of rosehip, rowan, look for sea buckthorn, pick flowers, collect it all in a huge bouquet, put it in a vase and enjoy the autumn still life.
Doll-amulet Rowan
From two rowan twigs, a small string of rowan beads (or any red-orange beads), a piece of cotton wool and several scraps of fabric and braid, you can make a beautiful folk amulet doll
Rowan, which protects the house from evil and misfortune. The main thing in this doll is the rowan twigs.
- a rectangular piece of red cotton or linen fabric;
- a square of white matter;
- colored patches for a scarf and apron;
- a piece of braid for a headband;
- red cord for belt;
- rowan beads;
- strong cotton or wool red thread.
The twigs need to be carefully cut so that one is shorter than the other: it will make handles. We fold the twigs crosswise and tie them with red thread.
We place a piece of cotton wool on the top of the long twig, trying to give it a spherical shape.
Then we take a square piece of white fabric, cover it with cotton wool and tie it tightly with red thread, forming a head. You need to try to straighten the fabric so that no folds form on the “face”. The flap is positioned so that its corners form something like sleeves for twig handles. We fasten the fabric to the “wrists”, also tying it with red thread.
The photo shows how to form the “chest” of a doll from another piece of cotton wool, but this detail can be omitted.
Now it's time to dress Rowan. We take a red rectangular piece, the length of which is equal to double the distance from the “shoulders” to the end of the long twig. Traditionally, scissors are not used to make amulets dolls; all fabrics are torn by hand, but for children's handicrafts you can't do without scissors. Cut the flap lengthwise to make 2 long strips. We wrap them around the doll as shown in the photo, so that it looks like a sundress. We tie the sundress with a belt, and use it to fasten the apron.
We attach a piece of braid to the doll’s head in the form of a headband, over which we tie a scarf. All that remains is to give the doll a string of rowan beads, and Bereginya Ryabinka is ready.
Children love making dolls, and the process of making Rowan will certainly be interesting to them. Along the way, you can come up with a fairy tale about a doll made of rowan twigs.
If for some reason natural materials for creativity are not available to you, create from what you have at hand: cereals, newspapers, clothespins. The main thing is to give free rein to your imagination, and you will succeed!
Children are easily captivated by something new and interesting. If your child is already bored with drawing or modeling, you can invite him to make crafts from bright autumn leaves. This process is extremely fascinating - amazing things are born from simple dried leaves with the help of glue, thread and other improvised devices. By taking up appliqué or making vases and bouquets, the child will not only be able to develop his creative skills and imagination, but also get to know the environment better. Collecting a herbarium for crafts together is an excellent opportunity to teach your child to distinguish between different tree species. So, what can you make from leaves?
How to Skeleton Leaves
Leaf skeletons, due to their lightness and transparency, look very impressive as decoration. To achieve this effect, you need to resort to a special technique - skeletonization.
What you will need:
- any fresh leaves;
- soda;
- egg dye;
- small container - ladle or pan;
- Toothbrush;
- paper napkins.
How to make skeletonized leaves:
- Mix soda and water in proportions of 1 to 4 and place the leaves in the prepared solution so that they are completely hidden by water.
- Bring the mixture to a boil and leave to simmer for 30 minutes.
- Remove the pan from the stove and remove the leaves, carefully placing them on the table with the glossy side up.
- Remove excess moisture using napkins.
- Clean the pulp from the leaf with a brush (this must be done very carefully, the leaves are quite fragile).
- Rinse the skeleton under water and then paint it the desired color.
- Leave the painted skeletonized leaves to dry.
The resulting material is ready for use.