Balcony furniture for conservation storage
The most successful way to save limited space is to use shelves, racks and cabinets for storing preserved food on the balcony. Let's consider options that are convenient to use and suitable for a harmonious interior arrangement.
Racks and shelves
Horizontal surfaces located at a convenient height are considered the most suitable place for placing numerous jars with winter preparations. They can take the form of open and closed shelves suspended from the walls, or racks that occupy all the free space.
Even one small shelf can accommodate a dozen cans
However, not every shelf is suitable, because jars filled with liquid and food have considerable weight. Therefore, conservation shelves on the balcony should have the following characteristics:
- durable, processed material;
- high-quality metal fasteners (plastic will not work);
- sufficient length and width;
- a suitable height for comfortable use (approximately from 0.6 m to 1.7 m).
It is better to select the maximum width so that 2-3 rows of cans can freely fit on the surface, but keep in mind: the larger the width of the shelf, the stronger the fastenings should be.
Where should the shelves be installed? On typical balconies, the entire front side is occupied by double-glazed windows, the back wall is occupied by a window and an entrance door, and two end walls remain. They are suitable for hanging shelves, provided that the wall is strong. Loggias with concrete and brick walls benefit. However, if, when insulating a balcony, you foresee the installation of shelves or built-in cabinets in advance, then with other options there will be no problems with creating a mini-warehouse.
Shelves made during thermal insulation and wood lath paneling
To save space, which is usually not enough, it is important to correctly consider the height of the shelves. Think about the types of jars you typically use and adjust the space between shelves to accommodate them. Don’t forget that a distance of 10-15 cm above the jars will allow you to quickly find the canned food you need and carefully move the containers apart to get what you need.
Simple ways to create a convenient pantry with shelves:
- process wooden boards yourself (chipboards, MDF, plywood are also suitable), put together shelves and hang them from the walls;
- buy a ready-made wooden or metal rack according to the size of the balcony;
- organize storage during the process of sheathing and insulation;
- make universal decorative shelves and, if necessary, use them to store workpieces.
Advice! Canned food should not be placed in the light, so for long-term storage of canned food, be sure to equip all shelves with doors.
Option for self-production - wooden shelves on a metal profile
Where and how to store homemade preparations
For each type of homemade product, it is necessary to maintain a special temperature regime and ensure correct storage conditions. At what temperature the preserved food should be stored depends on the technology of its manufacture:
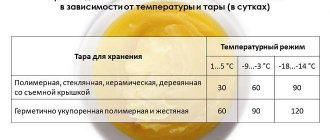
- Products subjected to canning, i.e. hermetically sealed after heat treatment, can be stored at a temperature not exceeding 20 ° C and a humidity not exceeding 75%.
- Pickled, salted and soaked fruits should be stored at a temperature of 0 to 4 °C.
- For forest and garden gifts (mushrooms, berries, fruits), homemade canned meat and dairy products, the optimal temperature background is 3-8 °C.
- It is unacceptable to store glass jars at sub-zero temperatures. Freezing the contents is fraught with physical bombing that occurs due to the expansion of the liquid. Needless to say, the fruits will lose their appearance and their texture will deteriorate?
Note to the hostess
Do not consume the contents of cans that have been physically bombed. The freezing point of the brine is low to suppress the development of microflora that has penetrated through the deformed lid.
Based on these recommendations, you can independently choose a place to store the workpieces. Typically, cellars, basements, and garages are used for these purposes, but in an apartment you can also find a secluded corner for your culinary masterpieces.
Cellar
For storing canned food, jams and pickles, the cellar or underground of a private house is considered the optimal place. This room allows you to maintain the required level of humidity and temperature.
- To ensure the safety of the contents of the jars, care should be taken to ensure good ventilation, eliminate the risk of the cellar freezing, and if necessary, insulate it.
- It is also important to take care of the destruction of fungi and mold by treating walls and storage shelves with copper sulfate or bleach solution. This is done to protect vegetables and pickles stored in the cellar under nylon covers from the penetration of microorganisms.
Video tips for setting up a balcony cellar
Balcony cabinet updates:
Insulated and spacious wardrobe:
Review of a homemade heating cabinet:
As you can see, even in a city apartment you can find a suitable place to store numerous pieces and twists that you have prepared yourself. It remains to decide which design is more suitable for your balcony, because the choice is really wide: from stylish custom-made cabinet models to convenient, self-made storage boxes and shelves.
Source
At home, canning, pickling and pickling help preserve vegetables, mushrooms and fruits for a long time. In the article you will find information on how to properly store preparations in the winter in apartment conditions, on the balcony and in the cellar, what conditions are optimal for saving. You will also learn why delay is dangerous, how to recognize it, and what the shelf life of various types of homemade products is.
How to make a canning rack with your own hands
What we have: a typical city balcony, glazed, insulated and renovated
Our goal: to independently make a simple but convenient wooden rack for storing homemade preparations or other products (fresh vegetables, fruits, cereals, etc.).
Neat shelving with comfortable wide shelves
So, for the work you will need a tool for working with wood (plane, saw or jigsaw, chisel, sandpaper), a marking tool (construction tape, level, marker, square), a drill for installing dowels in the wall, and a screwdriver. We will use wooden blocks and boards purchased at the supermarket as the main building material.
Advice! If you don't want to bother with woodworking, you can order the parts from a workshop, but making them yourself will cost less and may allow you to acquire new skills.
Having prepared the tools and materials, we proceed according to the following plan:
- We measure the height of the room, determine the dimensions of the shelves, and mark the places where the bars are attached to the wall, floor and ceiling.
- We measure and saw off the bars (for the frame) and boards (for the shelves) to the given dimensions.
- We process all wooden parts with sandpaper and, if necessary, cover them with protective impregnation with an antiseptic.
- We mount the frame: first we install four long bars vertically, securing them with dowels, then we attach crossbars to them with self-tapping screws, on which the shelves will be supported.
- We install shelves using boards adjusted to size.
We pay attention to the reliability of the elements fixed on the wall
After finishing the work, the finished rack can be painted in any suitable color. It is better to use acrylic paint: it fits perfectly on wood, dries quickly, does not smell and is absolutely safe.
The open part of the double-glazed window can be covered with a curtain, but it is better to make the adjacent wall of the cabinet blank
With such a rack, you won’t have to rack your brains over how to store canned food on the balcony in winter - the jars will stand in orderly rows in one place. And to prevent the sun's rays from spoiling the results of your work, containers can be placed in plastic boxes with lids or the rack can be equipped with a convenient system of horizontal blinds.
Preservation storage conditions
First, a little theory. The fact is that storing different types of preserves requires special preparation and storage conditions. Taking into account the fact that all recipe recommendations are followed during cooking, and the dishes (glass or metal jars) are sterilized and tightly closed, the following temperature requirements are imposed on canned food:
- fish – from 0°С to +15°С;
- meat – from 0°С to +20°С;
- mushroom – from 0°С to +15°С;
- vegetables (fermented and salted) – from 0°C to +25°C;
- fruits and berries – from 0°С to +25°С.
Temperature indicators for pickles and starters stored in barrels, others - from -1°C to +4°C. Therefore, on an insulated balcony it is recommended to keep only products in glass and metal containers specifically designed for preservation. The humidity in the room should not exceed 75%, and regular ventilation is also a mandatory requirement (which is easy to do on the balcony).
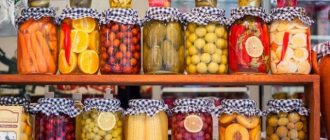
Homemade twists are the best snack for the New Year's table
In addition to temperature restrictions, storage periods must also be observed. For example, it is better to sell home-cooked meat and fish within the next year, while pickled gherkins or salted saffron milk caps will easily survive 3 years.
Seamer - an easy-to-use tool
Although new-fangled packaging for long-term storage of various products appears on the market every now and then, the best tableware remains glass jars and bottles made from a special type of glass that is resistant to high temperatures. The standard volume of cans is from 0.35 l to 1.2 l, but 2- and 3-liter containers are often used for pickling cucumbers or sealing semi-finished vegetable products. Products are sealed with tin lids using a seaming machine.
General recommendations
Most of the preparations that are usually made to enjoy in winter contain preservatives that do not allow bacteria to multiply and spoil the product. Therefore, storing pickles and preserves when properly prepared does not require special conditions. To do this, it is enough to have a dark, cool room. If finances allow, you can buy a separate refrigerator without a freezer; such devices are cheaper and will do the job perfectly.
Advice! It is much easier for residents of Khrushchev-era apartment buildings to resolve the storage issue. They can use a special refrigerator in the wall under the kitchen window. You can store pickling there even in winter at low temperatures.
At what temperature can pickles and preserves be stored? The main thing is that it does not exceed 20 degrees, otherwise the jars may explode. Too low a temperature is also not suitable, so storing it on the balcony if it is not insulated in winter is not advisable. At the same time, it is important to protect the pickles from exposure to direct sunlight, which is extremely harmful to the preparations.
We recommend reading: How to Determine If Sour Cream Has Spoiled Not Opened
Unlike canned preparations, salted vegetables must be stored strictly in the refrigerator. They are not able to survive in warm places.
In the underground loggia
For such a cellar it is not necessary to have a balcony with a lot of free space. It can be built on the smallest loggia. Three-liter jars, of course, are unlikely to fit under the floor of your balcony, but jars with a capacity of half a liter to one and a half liter are fine! This type of cellar is the most common, so in our article we will look at instructions for building it yourself.
The first thing you need to do is take measurements. Arm yourself with a centimeter and determine how many centimeters it is possible to raise the floor on the balcony. Next, you need to insulate the concrete floor of the balcony. In order to save space, it is better to use foil polyethylene foam. The floor should be rigid and not sag, so it would be best to make it from boards up to 2 centimeters thick. All that remains is to cut out the hatch and attach the door. It can be made either folding or sliding.
(no votes yet)
Container on the loggia
Let's start with the most basic. This type of storage requires placement in a heated room. It can be made from OSB or chipboard. The frame of the box is made of timber, the walls and floor are covered with sheet material.
Making such a box is not at all difficult. The only thing that can cause difficulty is the lid. And here everything is quite simple - you only need door hinges.
Another significant point: if you put all the vegetables in one large box, it will be very difficult to sort through and get them out. To make the task easier, consider the dimensions of the box so that smaller boxes, for example, plastic ones, fit on top of each other.
You can buy such boxes or simply ask for them at your local grocery store.
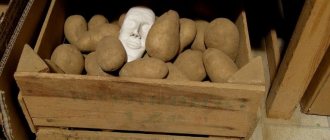
Place your onions, carrots, beets and potatoes in such neat, small and lightweight boxes - and it will not be difficult for you to sort and remove vegetables.