Surprisingly, such a dietary, tasty and healthy product as cauliflower is very simple in agricultural technology. All that is required to obtain a bountiful harvest is moderately warm weather, sufficient watering and regular fertilizing with fertilizers containing additional microelements (manganese, molybdenum, magnesium and boron).
Even a novice gardener can cope with this. There is one trick when growing cauliflower: to increase the density of the heads during growth, it is recommended to shade them from sunlight.
Harvesting time for cauliflower
Everyone wants to get a harvest with excellent taste, which will also be stored for a long time. First of all, it is necessary to focus on the characteristics of the varieties, since cabbage, like many other crops, has its own ripening dates that cannot be violated.
There are a number of varieties intended for cultivation in different climatic zones.
Cabbage varieties:
- Early ripening. From the time the first shoots appear to maturity, at least 75 days pass (depending on weather conditions, another 3 weeks can be added here). It is approximately cut off in mid-June.
- Mid-season. Ripening period is 95–125 days from the beginning of germination. The harvest is harvested in summer.
- Late. You need to remove such heads from the garden after about 4-5 months - in the last weeks of August and until mid-September. Although they have the longest growing season, they are the ones that last the longest.
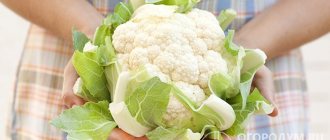
The inflorescences can be cut when their diameter reaches 11–13 cm and their weight reaches 400–1100 g. The heads should be elastic, fresh, and dense. There is no need to wait until they become large, otherwise it is very easy to miss the moment when the heads become overripe. Overexposure leads to a deterioration not only in presentation, but also in taste characteristics.
Cabbage that is not harvested on time turns yellow and takes on a purple hue. As a rule, normally the heads should have a milky white or light cream color, be prominent, with a dense structure.
There should be no sprouted leaves inside. The defining sign that a head of cabbage can be cut is the presence of three adjacent leaves on the head.
Early
The first heads grown from early varieties are picked at the end of June or beginning of July. To do this, seeds are sown in greenhouses in March. At the end of April, beginning of May in temperate climates, seedlings are transplanted into open ground.
Here are some examples:
- The early and early ripening variety Snow Globe can be sown 2-3 times at intervals of 2 weeks in order to constantly have fresh produce in the middle of summer.
- Hybrids Movir 74 and Early Gribovskaya 1355 are resistant to high and low temperatures. Owners of film shelters have been sowing them since mid-February.
- Mid-early Snowball 123 has a growing season of 90-119 days. Many gardeners achieve success by planting seeds of early varieties and hybrids directly into the garden.
Attention! Regions with cool or short summers prefer early varieties due to their frost resistance.
Thanks to the seedling method of cultivation, this crop has taken root in the conditions of Siberia and the Urals. In the Leningrad region, early varieties are also cultivated by seeds.
Average
Varieties, almost the entire growing season of which occurs during long daylight hours and heat, form heads 100-120 days after germination. Examples include the drought-resistant Classic F1, the tasty White Head, and the bright Graffiti F1.
Late
The later the variety, the longer it can be in the garden, and the longer it can be stored in a cellar or refrigerator.
- The mid-late Dutch variety with yellow-green stalks Universal and the late-ripening Birdergrus are ready for consumption in 120-130 days.
- Late Snow March has a growing season of 180 days.
Note! Late ripening varieties have better fresh preservation rates.
In the southern regions, such as the Krasnodar Territory, all types of varieties are used, using them for each period of the agricultural season. Early varieties are sown as soon as the snow melts to avoid flowering or loosening of the heads during the rapidly approaching heat.
This is interesting: Slugs on cabbage - how to get rid of them
Hybrids with medium planting and ripening periods are adapted to long and hot summers.
How to grow seedlings?
To get a good harvest, it is extremely important to grow strong seedlings. This process can be divided into several stages, each of which requires special attention.
Substrate preparation
You can buy it in the store or prepare it yourself, but in advance - in the fall. The soil for seedlings should be nutritious, moisture-absorbing, loose and neutral (pH about 6-6.5), since cabbage does not tolerate acidic soils. Taking this into account, the following compositions can be prepared:
- lowland peat, sand and humus – 1:1:10;
- lowland peat, rotted sawdust, mullein - 3-5:1-1.5:1.
All types of peat can be used in preparing the substrate, since it perfectly absorbs moisture, is breathable and does not compact. When using a lowland variety, sawdust should be added (up to 1/3 of the composition).
The finished substrate must be steamed for 2 hours, and then nitrogen fertilizers must be added. Here are popular options:
- urea or ammonium nitrate – 20-25 g;
- complex fertilizers – 50 g per 1 liter.
In addition, 300-450 g of dolomite flour can be added to 10 liters of high-moor peat. If the fertilizer does not contain microelements, it is worth adding 1 cup of wood ash in addition, since this is an organic source of potassium, which also reduces the acidity of the soil and increases the concentration of phosphorus, boron and manganese in it.
Store the finished substrate until spring in a place protected from rodents.
Seed treatment
For sowing, it is better to choose only large and heavy seeds. They need to be processed as follows:
- For disinfection purposes, soak dry seeds for 15-20 minutes in hot water (+45...+50°C). This will help destroy viruses on their surface, which can continue their vital activity in the soil and provoke various diseases in the growing crop. Soaking can be done in a thermos.
- After soaking, immediately cool the seeds in cold water and dry.
- Soak the seed in a solution of mineral fertilizer for a day, otherwise, after scalding, they will not be able to release the flower arrow. For example, for pecking and germination, seeds can be soaked in a Nitrophoska solution (1 tsp per 1 liter of water). Untreated material can simply be soaked in a solution of Fitosporin to get a double effect - treat it against diseases and provide the necessary mineral nutrition.
- When the seeds sprout, harden them. To do this, they need to be transferred to a cool place for a day, where the temperature is kept at +2...+5°C. For example, they can be placed on the bottom shelf of the refrigerator. Next, you need to take out the seeds, keep them warm for a day and put them back in the refrigerator for a day.
Properly treated seeds will grow into strong seedlings that will be more resistant to unfavorable conditions.
Sowing seeds
At the optimal time, they can be sown for seedlings, adhering to the following order:
- Prepare containers for growing seedlings. The best option is peat pots or plastic cups with a diameter of at least 6 cm, since in this case there is no need to pick the plant. As a last resort, you can use a deep box.
Cauliflower does not like picking, because it is a lot of stress for it, which can lead to a delay in development by 1-1.5 weeks.
- Pierce the substrate in the oven for 5 minutes. Acceptable temperature is 60-80°C. Thanks to this technique, the soil will be cleared of pathogenic microflora, which will increase the disease resistance of future seedlings.
- Place drainage at the bottom of the prepared container, and then fill in the substrate.
- Make small depressions 0.5 cm deep on the soil surface, throw 2-3 seeds into each hole, compact the soil and mulch with a thin layer of sand. If planting is done in a common box, then the seeds should not be placed too densely, otherwise when transplanting the seedlings to a permanent place, their roots may be damaged. So, sowing should be done in rows, making furrows at a distance of 3 cm from each other and laying out seeds at intervals of 1 cm.
- To preserve soil moisture, cover the crops with a transparent film.
How to plant seeds in cassettes so as not to have to pick in the future, learn from the video below:
Seedling care
It consists of carrying out the following agrotechnical activities:
- Organization of optimal temperature conditions. Until the first shoots appear, the temperature should be maintained in the range of +18…+20°C. When the seedlings appear (usually 7-10 days after sowing), remove the protective covering and move the seedlings closer to the light source, and lower the temperature to +6...+8°C, otherwise the seedlings will become excessively elongated and the root system will be underdeveloped. After 5-7 days, the temperature regime needs to be changed again: during the day it should be maintained at +15...+18°C, and at night – +8...+10°C.
- Topping. If all the seeds in the hole sprout, you need to leave only the strongest sprout, and pinch the rest at ground level. You cannot pull out excess shoots, as this can damage the root system of the plant.
- Watering. Seedlings do not tolerate excess moisture or excessive dryness, so they need to be watered moderately with settled water at room temperature once a week. To maintain moisture in the soil, it is a good idea to mulch it with river sand or vermiculite. There is no need to loosen the soil, since the roots of the plant are located close to the surface and can be easily injured. After watering, it is worth ventilating the room. Acceptable air humidity is 70-80%.
- Feeding. Cauliflower is particularly demanding of boron and molybdenum, so when 2-3 true leaves appear, the seedlings should be sprayed with a 0.2% solution of boric acid (2 g per 1 l), and when 3-4 true leaves appear - with a 0.5% solution of molybdate ammonium (5 g per 10 liters of water). A week before transplanting, you need to completely eliminate the use of nitrogen fertilizers, but 2-3 days before this, the plant can be fed with phosphorus and potassium (2-3 g of superphosphate and 3 g of potassium chloride per 1 liter of water) to increase its cold resistance.
- Dive. Cauliflower seedlings do not tolerate picking well because they have a very weak and shallow root system. So, from the very beginning, the seeds should be sown in separate cups. However, if they were nevertheless planted in a common box, then with the appearance of 2 true leaves the seedlings will have to be plucked. To do this, you need to prepare separate deeper containers so as not to injure the roots when transplanting seedlings into open ground. After picking, keep the seedlings at a temperature of +21°C. When it takes root, the temperature should be maintained at +17°C during the day, and +9°C at night.
- Hardening. 10 days after planting in a permanent place or at the age of 40 days, seedlings with 5 true leaves should be taken out to a balcony or greenhouse for several hours so that they gradually get used to the open air.
Hardened seedlings can tolerate frosts down to -5°C.
Influence of external factors
It is important to learn how to determine ripeness not only by the information on the packaging and belonging to a particular variety, but also by external indicators. The fact is that temperature, air humidity, the presence or absence of precipitation, the number of sunny days - all this directly affects the timing of harvesting.
There are such nuances here:
- The optimal temperature for the formation of dense and tasty inflorescences varies from 16 to 24 degrees. If the summer is cold, the development of the heads is greatly inhibited. Heat also has a bad effect on the quality of cabbage; it quickly fades into color, forming small and falling apart defective inflorescences that are unsuitable for food.
- This vegetable crop loves moisture very much. Poor watering and drought are the main reasons for the formation of small heads with inflorescences loosely adjacent to each other.
- Experienced summer residents advise shading the ovaries from direct sunlight. But there are bred hybrid varieties that are self-covering. This means that their foliage closes over the inflorescence on its own, without any human effort.
- Artificial reduction of daylight hours is practiced everywhere. This makes it easy to grow strong cabbage.
- Like all other crops, on depleted soils the plant bears fruit poorly, forming heads late. The quality, volume and structure of the ovaries in such cases are also far from perfect.
During cultivation, you should not get carried away with nitrogen fertilizing, which will spoil the crop much faster.
Cabbage storage conditions
It’s not enough to harvest a crop—you also need to be able to preserve it. The room where the cabbage will be stored must be prepared in advance. Having ventilated it properly and disinfected it with lime whitewash, it would also be a good idea to fumigate the walls with sulfur (30-40 g per square meter). Cabbage is very sensitive to temperature conditions. The optimal air temperature should be maintained between 0 and 1 degree. When the temperature rises to 4 degrees, cabbage sprouts and cracks. Freezing of heads of cabbage is also unacceptable. At temperatures below -2 degrees, the core may darken. All this negatively affects the taste of cabbage and its appearance. Maintaining the required temperature is ensured by supplying outside air using hatches.
Air circulation will help provide the necessary humidity in the room. Air humidity for best storage of cabbage is 85-95%. To maintain it within these limits, it is recommended to provide high-quality ventilation. To do this, use regular ventilation of the room more often by opening doors, if the weather permits. Frequent ventilation will also help avoid the accumulation of carbon dioxide, which usually appears in vegetable stores.
Collection technology
In order not to destroy the grown crop, you need to know at what time and how to properly remove cabbage fruits from the garden, as well as how long they can be left in open ground.
The rules for cutting cauliflower heads are as follows:
- The harvest from the garden bed is harvested sequentially - this means that every two to three days a maturity check is carried out and the ripened cabbage is immediately harvested.
- Harvesting is carried out on a sunny day at a temperature of +8°C and above.
- The best collection time is from 14 to 19 hours.
- An important point - if the cabbage blooms, it is better to remove it immediately.
- The heads must be cut off with a sharp knife, but under no circumstances should they be broken off.
- Cabbage is cut 3–5 cm below the head (see photo).
- When cutting, you should grab 5-6 lower leaves.
- The harvested crop is transferred to a cold and dark storage facility. If a vegetable stays under the sun for more than 5 hours, it may lose its color and taste.
Important! You should not harvest the crop immediately after rain - the cabbage will lose its inherent taste and aroma and will not be able to be stored for a long time.
Reasons for delaying harvest
Cauliflower manages to ripen in open ground in almost all regions of the country. But it is sensitive to moisture, scorching rays, bright light, and lack of nutrients.
At temperatures below 15 °C, the development of cauliflower slows down or even stops. If the plant is treated with drugs against fungal diseases during this period, there will be hope that it will reach maturity and the planned size.
In such cases, the timing of harvesting is determined based on the size of the head and from observations of the growth rate. Heads larger than 10 cm in size are removed if no increase in useful mass is noticed within 3 days.
For reference! A cauliflower head with a diameter exceeding 20 cm is considered good.
Growing up
The longest segment in the cabbage growing season ends with the beginning of tying the heads. The edible part can be ready in 2-3 weeks. Naturally, it is a shame and unreasonable to destroy the plant at this stage due to the autumn cold snap.
This is interesting: We remove cabbage from the garden for storage for the winter
It is practiced to dig up healthy, well-developed stems along with roots and leaves and grow the heads in a cellar or greenhouse. The more magnificent the leaves, the better, since they, knowing that their period has expired, will give their nutrients to the fruit.
In the cellar, plants are buried up to the leaves in boxes covered with damp soil. If light leaks from somewhere, cover the cabbage with a dark film. As a result, the head of cabbage can increase one and a half times and will not rot, which is also important, given the difficulty of long-term storage of this vegetable.
How to properly harvest cabbage
It is recommended to harvest cabbage during the dry season. If the cabbage was harvested during wet weather, the cabbage heads should be thoroughly dried before storing them. In order for cabbage to be stored for a long time and not lose its taste, it is advisable to stop watering it 3 weeks before. You need to cut the head of cabbage in such a way that the stalk remains as long as possible. You can also simply twist it out of the ground along with the roots. Thanks to the long stalk, it is very convenient to hang heads of cabbage for storage by tying them together. In this form, cabbage is preserved much better. You need to cut the head of cabbage so that 2-3 green leaves adjacent to it remain, which will protect the head of cabbage from damage, fungal diseases and rot.
Ways to preserve the harvest
Cauliflower is a very delicate crop. In a freshly cut state, it can be stored for no longer than 7 weeks, and only if certain requirements are met.
- The most common and effective way to preserve ripened heads is to put them in wooden or plastic containers, and then send them to a room with high humidity (up to 95%) and a temperature of 0–2° C. This way, the cabbage will remain fresh for almost two months.
- If, under the same conditions, you simply hang the cabbage upside down, it will be stored without loss for 3–4 weeks.
- The labor-intensive, but longest-lasting way to store fresh cabbage is to transplant it into boxes with soil located in a dark and cool (+4–10° C) cellar. To do this, pre-watered plants are dug up along with their roots and planted very tightly in a prepared container, covering them with soil right up to the leaves. The main condition for such storage is absolute darkness. Therefore, if there is a light source in the room, the cabbage should be tightly covered with any opaque material. In this state, the crop will not lose freshness for several months (from 1 to 4, depending on the variety), and small specimens will even grow.
- You can save part of the harvest in the freshness zone of the refrigerator if you tightly wrap the inflorescences in cling film, after cutting off the leaves and stumps. If there is no film, use a regular plastic bag and seal it tightly.
- The longest storage of the crop (up to 12 months) is possible in frozen form. To do this, the heads should first be disassembled into separate fragments, thoroughly washed and dried, and then frozen. Some housewives recommend lightly boiling the cabbage with this storage method.
How to preserve cabbage
For storage, healthy, dense, medium-sized heads of cabbage should be selected without signs of any diseases. Before storing, it is necessary to remove the remaining soil from the heads of cabbage and dry them in the fresh air. In order to protect cabbage from damage by gray rot, the method of dusting the cabbage with chalk is used. It is recommended to harvest cabbage while preserving the long stalk.
It is best to store heads of cabbage with such a stalk hanging, periodically removing rotting leaves. Cabbage can also be stored wrapped in paper and the heads arranged neatly on cellar shelves or in lattice boxes. The heads of cabbage need to be laid with the stalks facing inward.
Are you afraid of frost?
Is cauliflower afraid of autumn frosts? Cauliflower is known among other vegetables for being extremely heat-loving.
If the ambient temperature drops below +8-10˚ C, then small heads begin to form at the base of the white inflorescence, which will subsequently become spare shoots. The development of the main inflorescence will most likely stop.
With the onset of cold weather, the growth of cauliflower slows down significantly, which requires immediately sending them for ripening at home. Severe frosts can damage cabbage heads, but it is still possible to save them with the help of greenhouses.
This is easy to implement only if a stable temperature of +10° C is maintained inside.
You can learn how to freeze cauliflower in the freezer for preparing dishes in the winter from our other article. Find out also how to dry cabbage at home in an oven or electric vegetable dryer.
Cauliflower reaction to frost
Cauliflower is becoming an increasingly frequent guest in the gardens of amateur vegetable growers, not only because of its excellent taste and benefits for the body. But also due to its cold resistance. Not only are the plant’s seeds adapted to cold spring and even winter soil, but also the ripe heads tolerate frosts down to -5 °C.
If you can keep the plant in the garden to this temperature, you can be sure that the owners will have fresh cabbage until winter. With especially careful care and constant monitoring of the condition of the vegetable, dishes made from self-grown cauliflower will appear on the New Year's table.
Important! It is the extreme temperature that makes the heads of cabbage maximally protected from any external influences, activating the “immune system.”
But if even the slightest transparent spots are noticeable on the heads of cabbage, it means that you have gone too far with the “hardening”, and the stalks touched by frost must be used for food on the same day.
This is interesting: Cabbage won’t tie into a head of cabbage, what should I do?
Susceptibility to frost damage is high in weak, underdeveloped, diseased plants. These should not be kept in the garden for as long as possible. You can't strengthen them anymore.
Frosts also threaten cauliflower in the spring. The sprouts may not die, but will partially freeze. If this is not a growing point or roots, then it’s not scary. Such wounds on the leaves usually do not cause significant harm, since in early spring there are not yet a huge number of harmful microorganisms in their prime.
You can still try to take protective measures:
- In the event of a known weather forecast with expected frosts, gardeners arrange fumigation of plantings with smoky fires.
- If cauliflower is a priority, and the site is located on a slope or partially in a lowland, in a year with a threat of frost, cabbage is planted in the upper part of the slope or at relative elevations. It is advisable that these places be protected from the wind.
- Watering the soil around the plants helps. By releasing the heat received from the sun during the day at night, water softens the microclimate around young shoots. Sprinkling can be dangerous. If the wind suddenly rises and the temperature drops to -4 °C, the seedlings are guaranteed to freeze.
- Adding organic and potassium-phosphorus fertilizers to the soil before planting will not only provide a long supply of nutrition, but will also protect the plants from the cold.
As you can see, the agricultural technology of growing cauliflower has many advantages that make this process easier for amateurs. It is difficult to find a gardener who does not appreciate this vegetable for its taste.
If there are no conditions for autumn-winter storage, then proper harvesting over several months of summer and autumn will compensate for labor costs.