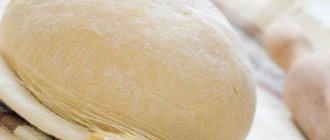
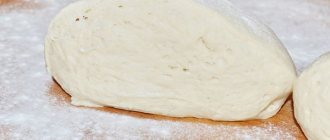
Preparing dough is always long and difficult, especially if it is yeast. Sourdough, settling, kneading, kneading, wrapping in heat away from drafts - this process is too long to treat yourself to rich buns or pies every day. And I really want fresh baked goods! This raises the question: is it possible to freeze yeast dough? After all, it has its own specifics. We see frozen puff pastry being sold in stores. Yes, and to prepare it you need the help of a refrigerator. But in puff pastry and shortcrust pastry, the ingredients are milk, butter, eggs, flour, sugar and salt. And in our case, we are dealing with a living culture of yeast bacteria. How will they feel in a state of shock freezing? Will our dough change its properties after being in the refrigerator? Will the baked goods rise? Will it have the same taste as freshly prepared dough? We have to answer these questions in this article.
Something about bacteria
In order to answer the question of whether it is possible to freeze yeast dough, we first need to decide whether this will kill the yeast culture. It turns out that the simpler the organism, the more resilient it is. Bacteria, unlike humans, simply fall asleep in an unfavorable environment. That's why dry yeast exists. Once in a humid environment, these simple bacteria wake up and immediately begin the process of reproduction, causing the dough, and then the dough, to increase significantly. Yeast reacts to cold in the same way. They stop reproducing and go to sleep - until better times. It should also be taken into account that the vital activity of these bacteria depends on air. Therefore, when freezing yeast dough, you should completely cut off oxygen to it. Then, when the package is unwrapped, the bacteria will begin their activity even more actively. The dough will be saturated with air bubbles and increase in size right before your eyes. And the baked goods will become even tastier.
How to freeze yeast dough
There are several ways to prepare the base for buns for future use. It happens that we were about to bake something, but we didn’t get the ratio of dough and filling right. What to do in this case? Where to put the remaining yeast dough? There are other situations. For example, we formed the products, but decided not to bake them yet (or not to cook the whole batch). And finally, the third situation. We, as experienced cooks, are going to bake pies today, buns tomorrow, and pizza the day after tomorrow. And we want things to go smoothly, not to bother with the batch every time. And here the question arises: is it possible to freeze yeast dough in one way, or does each individual case have its own nuances? We answer: there is a difference in cooling conditions, although not very significant. In any case, the dough should not remain in the freezer for more than three months. And it can only last two days in the refrigerator. The formed pies can also be stored. But do not forget that it is difficult to protect them from weathering.
Choosing frozen dough
To keep the dough better and longer, it is subjected to shock freezing. It is not advisable to freeze the product a second time. For each type of dough, separate defrosting conditions are used. Frozen dough comes in several types: shortbread, puff pastry, puff pastry without yeast, gingerbread, chopped.
To buy a good and high-quality product in a store, you need to know a few secrets.
- Package. It must be sealed.
- Freezing method. It is usually indicated on the label.
- Number of layers. The more layers the dough has, the tastier the baked goods will be. This information is indicated on the product packaging. For example, yeast should have 35 layers, and yeast-free – 225.
- Best before date. The fresher the product, the better quality the products will be.
- Composition of the finished frozen product. Be sure to study the composition on the packaging and make sure it is harmless.
- Price. Quality products cannot be cheap.
- Product type. Products must move freely throughout the packaging, not stick to it and not have foreign inclusions.
Option: we initially prepare the dough for future use
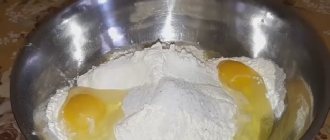
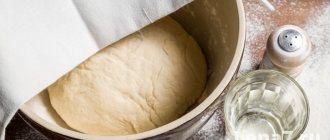
Some housewives do not wonder whether it is possible to freeze yeast dough - they do this on purpose to make the baked goods more airy. What do we need to know when we prepare the base for baked goods for future use? The fact that some bacteria in culture may not “survive the winter.” Therefore we will need more yeast. If you are cooking according to a recipe, you should do a simple arithmetic calculation. From the amount of yeast specified in the prescription, we calculate five to seven percent and sum the resulting number to the total mass. Preparing dough for future use also has its own specifics. If it is a pastry, prepare the dough. Then add the rest of the ingredients. In this case, it is better to use flour with a high gluten content. Let the dough rise a little. We don't need to knead it and knead it. As soon as the dough becomes homogeneous, prepare it for long-term storage.
Tubes with protein cream
Many of us have been familiar with the taste of this sweet delicacy since childhood. But not everyone knows how to cook it at home. To pamper your loved ones with these straws, you will need:
- 500 g of purchased dough.
- 150 g regular sugar.
- 2 raw eggs.
- A pinch of salt and a little oil.
The thawed dough is rolled out and cut into long thin strips. Each of them is rolled onto a special greased form, treated with a brush dipped in egg yolks, and baked in a moderately heated oven. The browned tubes are slightly cooled and filled with cream made from salted egg whites whipped with granulated sugar.
Step-by-step instruction
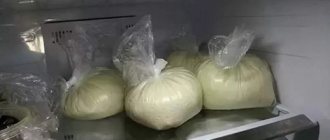
You should know that defrosted dough cannot be put back into the refrigerator. It needs to either be baked or thrown away. Therefore, we immediately divide the dough prepared for future use into portions - so that each piece can be used at a time. Place them on napkins and stick them in the freezer. Let's wait until the dough becomes hard as a rock. Now let’s put the kneading dates on the napkins and put these portions in strong plastic bags. To secure the edges, we will tie them with an elastic band to prevent air from entering. Put the bags back in the freezer. The dates will help us determine when the product should be disposed of.
Option: we want to save already formed products
In this case, prepare the dough in the usual way. The only thing we need to change in the recipe is to use slow-acting yeast. A colony of bacteria that is rapidly developing will go through its life cycle and die out. And slow-acting yeast will continue to work after repeated kneading and settling. The cake pan should be greased with oil. Place the dough and filling there and wrap tightly in several layers of foil. Cover frozen yeast dough pies lying on a board with cling film. It wouldn’t hurt to sign when this homework was done. Let's put our products in the freezer. We have been using them for three months.
Methods for cutting puff pastry and shaping products
What to cook from puff pastry? Croissants, puff pastries, baskets, envelopes, pies with all kinds of fillings... There are a lot of options. Choose!
Snail
1. Roll out the dough. Please note that if you take a whole layer, the snails will turn out to be quite large. In this case, we used half the layer.
2. Brush the entire area with egg wash. You can apply your favorite cream.
3. Add Myasnov BUFET raisins - dark or light, to your taste, chocolate drops or other filling to your taste.
4. Gently roll the dough.
5. You should end up with a roll like in the photo.
6. Cut the roll into portions. Separate the snails from each other, turn them over, place them on a baking sheet and bake.
Curl
1, 2. The first two stages repeat the initial stages of preparing the snail. The only difference is that in this case we used jam for lubrication. Myasnov BUFET craft jelly marmalade is perfect - with orange, cranberry or lime and ginger root.
3. Roll the dough on one side to about the middle of the layer.
4. Do the same on the other side.
5. The edges should “meet” exactly in the middle, as shown in the photo.
6, 7. Cut the resulting workpiece into portions. Please note that you need to work with a knife carefully so that the curls do not fall apart or lose their shape.
8. Decorate the curls if desired. We sprinkled the products with coconut flakes.
Kare
1. Cut the dough into squares approximately 10*10 cm in size.
2. Each square must be folded into a triangle.
3. Using a knife (we recommend a pizza cutter), make a cut on one side of the triangle, but not all the way through.
4. Turn the triangle back into a square, brush one corner along the edge, where the cuts are, with egg.
5. Take the resulting cut corner and move it to the opposite corner.
6. Seal the edges. This is why we greased them with egg. You have a square-shaped product.
7. Lay out the dough with cottage cheese 5% GOST, cottage cheese 18% GOST or baked milk cottage cheese 9% Myasnov FERMA, smooth the filling over the surface.
8, 9. Decorate the product with chocolate drops for baking and desserts. Get creative and come up with your own decoration.
Cheesecake
1. The cheesecake shape is a slightly more complicated version of the square. First, also cut the dough into squares measuring approximately 10*10 cm.
2. From each resulting square, cut out another smaller square, but pay attention: in two opposite corners, do not cut the dough all the way.
3. Take the opposite top and bottom cut corners of the large square in your hands and criss-cross them. The bottom corner should be at the top, the top corner at the bottom.
4. Secure the edges of the cheesecake with egg.
5.6. Place the cottage cheese and smooth the filling over the surface.
Bow
1. Here we also take a square as a basis.
2. Fold it into a triangle again.
3. Where the triangle has a right angle, make two parallel cuts.
4. Separate the resulting parts as in the photo, and your bow is almost ready. All that remains is to tie a knot.
5. Take the tail and wrap it around the narrow central part of the bow.
6. To prevent the knot from unraveling, you can also use an egg to secure it.
7. Brush the product with egg and sprinkle with cinnamon.
Sweet basket
1. Looking at the photo, it seems that it is very difficult to prepare such a basket. Nothing like this! We can easily and simply make it from the same square blank.
2. Take the dough with both hands, as in the photo, and carefully, so as not to tear the dough, place it in a silicone baking mold.
3. Place so that the corners of the square remain hanging out of the mold. Therefore, before cutting the dough into pieces, consider the size of your ramekins.
4. Straighten the workpiece so that it fits snugly against the walls and bottom of the mold.
5. Straighten the triangular “ears” so that the finished basket turns out neat and beautiful.
6. Now we fill our future basket with filling. We used cottage cheese 5% GOST Myasnov FERMA, pre-mixed with reservoir sour cream 15% GOST Myasnov FERMA and sugar Myasnov BUFET.
7, 8. Then added strawberry slices (large berries were cut into 4 parts, medium ones - into two). Instead of strawberries, you can use pieces of your favorite berries or fruit.
Unsweetened basket
This pastry differs from the previous one only in the filling. Therefore, we repeat the steps of preparing the basket itself and begin filling it.
5. You will need pre-diced Mozzarella Myasnov FERMA cheese, cherry tomatoes - you can put them whole or cut them in half.
6. First add a couple of mozzarella cubes.
7. Add a couple of tomato slices. If the basket is not yet full, repeat.
8. Decorate the basket with herbs or herbs to taste. We used fresh thyme sprigs. Show your imagination and experiment with the filling!
Flower
1. This pastry stuffed with boiled Myasnov sausage is round in shape, but first we need our square piece.
2. Place a circle of sausage on the workpiece.
3. Top with another square of dough of the same size.
4. Cut a circle of dough along the contour of the sausage circle.
5. Make eight cuts as shown in the photo. The middle of our future flower should remain untouched.
6. Take the petal and turn it counterclockwise.
7. It is necessary to turn the petal over so that it twists 900 at the base.
8. Carry out this manipulation with each of the petals. Your hearty, tasty and beautiful breakfast is almost ready! You just need to bake it.
Croissant
1. As a base, we will need a triangle, which can be obtained from a square piece by cutting it diagonally. Please note that one corner of the triangle should be very sharp.
2. Make a small cross-section at the base of the triangle.
3. Slightly push the resulting parts apart. This is necessary so that we subsequently receive a croissant of the correct shape.
4. Place a piece of butter, for example Traditional Myasnov FERMA, in the center of the workpiece. Butter with different flavors is perfect - Strawberry Myasnov VKUSNYASHKA, Chocolate, Almond Myasnov FERMA. You can also use craft jelly marmalade Myasnov FERMA, jam, chocolate spread, pieces of your favorite fruit or berries as filling.
5. Roll the workpiece into a “roll”.
6. The corner must be attached with an egg so that the product does not unfold during baking.
7. Give the “roll” a croissant shape by slightly bending the “tails” inward. The same cut that we talked about in step 2 will help you get the desired shape.
8. Brush the croissant with egg to get a crispy crust.
Triangle
1. We again use a triangle as a basis.
2. Make a small longitudinal cut closer to the base of the triangle.
3. Place the filling in the center. Here we used cottage cheese and strawberries.
4. Take the workpiece by the sharp corner and roll it.
5, 6, 7. Thread the corner into the cut you made so that it comes out on the back side.
8. Attach the corner to the product with an egg.
Pigtail
1. Cut the dough into rectangles measuring approximately 15x4 cm.
2, 3. Make a cut in the middle, almost along the entire length, but without cutting the workpiece completely into two parts.
4, 5. Take one edge of the strip and thread it inside the cut.
5. Pull it back towards you on the other side.
6, 7. Repeat the manipulation several times, moving towards the opposite end.
8. Brush the resulting braid with egg and sprinkle with Myasnov BUFET sesame seeds.
Option: we accidentally had leftover yeast dough
This case is the most difficult. After all, we could use both instant yeast and flour with low protein and gluten content. In addition, we went through all stages of working with the test. We let him rise, kneaded him, kneaded him, defended him. And then it turned out that a certain part of the test remained unused. How to save the product? Nothing could be simpler. Take plastic bags and lightly sprinkle the inside of them with flour. Divide the dough into portions and form into balls. We also roll them in flour and put each in its own bag. What is important: do not stuff the bags tightly. After all, the bacteria will not immediately realize that they are being frozen, and will continue to develop for some time. The risen dough may tear the bag. In this option we need a special temperature regime. Let's shock freeze the dough. Let's first set the camera to minimum. And then, when the dough in the bag turns into stone, you can increase the temperature to -15 degrees.
Proper defrosting
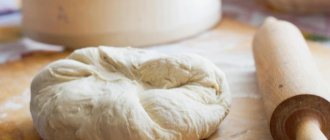
It is necessary to spare bacteria and call them out of sleep gradually. If we simply take a piece of dough out of the freezer and defrost it at room temperature (or using hot water or heating in the microwave), then the baked goods will not please us with their taste. Let's do it differently. The day before you are going to bake the product, transfer the piece in the bag from the freezer to the refrigerator without unwrapping it. Then you can take it out of the bag and open it at room temperature. The dough should rise and increase in volume even more. Then we crush it and form the products. Baking from frozen dough turns out very tasty and is in no way inferior in quality to the one for which the base was just made.
Snails with raisins
These delicious little rolls are loved by both big and little lovers of baked goods with dried fruits. Therefore, it is possible that they will often appear on your family’s menu. To prepare them, you will definitely need:
- 500 g frozen puff pastry.
- 100 g regular sugar.
- 200 g white raisins.
- 20 g melted butter.
- 1 protein.
The thawed dough is rolled out into a five-millimeter layer and brushed with melted butter. One side is covered with a layer of raisins. All this is rolled up, cut into approximately equal pieces and placed on a baking sheet. The resulting blanks are coated with protein, crushed with sugar and sent to the oven. Bake them at moderate temperature for about a quarter of an hour.