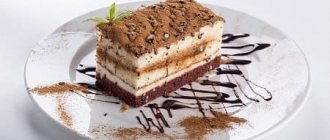
Today, cakes made from sugar mastic are becoming increasingly popular. Thanks to the variety of confectionery tools and ingredients, now not only professionals, but also amateurs can try their hand at this art. But you shouldn’t expect that you will achieve “unearthly beauty” the first time: the art of working with mastic, like any other art, needs to be learned. Each business has its own secrets and tricks, which can be achieved through trial and error. So that you can quickly and efficiently learn how to work with sugar mastic, we have prepared a selection of useful tips for you.
How to roll out sugar mastic correctly?
There are several ways to roll out sugar mastic:
- On a surface sprinkled with starch or powdered sugar.
- Between sheets of polyethylene greased with vegetable oil.
- On a non-stick mat.
The most famous method is to roll out the mastic on a surface sprinkled with powder or starch. The only difficulty with the first method is that the rolled out layer of sugar mastic must be constantly turned while rolling so that it does not stick to the surface. If you choose the second option, you will need to remove the top layer of polyethylene from the rolled out mastic, turn the layer over, evenly cover the cake with it, and only then separate the second layer of polyethylene. However, thin polyethylene (for example, cling film) is not suitable for our purposes: here we need to use something thicker and more substantial, like film for greenhouses.
Required Tools
Let's start with tools for working with mastic. Depending on what you are going to do with mastic, you will need different equipment:
- And the first is a special mat or board for modeling. Typically, such a rug is sold in stores for handicrafts and creativity; an excellent option is a board for modeling with plasticine;
- You will also need stacks - these are special tools for modeling and sculpting. They are usually sold in sets and come in plastic or metal. Stacks are designed for different purposes: to cut something, create irregularities and other elements necessary when creating figures;
- Metal modeling tools will help create relief. There are balls at the tip that will help create a relief of the desired size; they are also sold in sets. You can’t do without this tool when creating flowers and ruffles for a cake.
- A special mat that is necessary when creating relief on mastic. Thanks to its softness, it allows you to create the desired curves.
- If you plan to cover the cake with mastic, you will also need special “irons” to smooth the mastic on the cake.
- Cutters are an optional tool; you can use a small knife.
- Cuttings, weiners, silicone molds, textured rolling pins and mats. All this will be needed when creating flowers and an unusual relief coating for the cake.
- You will also need a rolling pin. It is better to take small acrylic rolling pins. They will allow you to roll out the mastic without any “flaws”.
What to do if the mastic keeps tearing or cracking?
Sugar mastic is not intended for very thin rolling. The thickness of the layer should be approximately 2–3 mm (thicker is also not advisable). Thinly rolled mastic has its drawbacks: firstly, it can tear while covering the cake, and secondly, all the defects and unevenness of your culinary masterpiece (for example, layers of cake and pieces of cream) will be visible under it. All errors must be corrected before you decide to cover the cake with sugar mastic. The surface of the cake should be smooth, without protruding edges or folds.
It is also possible that when mixing the mastic you used “coarsely ground” powdered sugar, which contains whole sugar crystals. There’s nothing you can do about it: this mastic will tear even when rolled out.
If the layer with which the cake was covered nevertheless breaks at the most crucial moment, do not despair. To restore the cake, it is best to remove the layer of mastic and cover it again. If the first step is impossible, then seams, patches and other defects can be “smoothed out” using a pastry iron and vegetable fat. Apply the fat to the damaged surface and smooth the cake with an iron until its surface is perfectly smooth. And if you suddenly find air bubbles under the layer of mastic, try piercing them with a needle and then carefully smooth out the “holes.”
Cooking recipes:
Mastic is an indispensable tool in the preparation of exquisite culinary desserts. How to make mastic for a cake at home is described in detail in this article. All you need is desire, time and creative impulse to come up with your unique cake design.
Mastic for cake at home
Ingredients:
- Powdered sugar 200 g;
- Water 0.5 cups;
- Gelatin 30 g;
- Lemon juice 0.5 teaspoon. spoons.
Cooking method:
Pour gelatin and water into a convenient bowl, stir well, and leave for 15 minutes. As a result, we will get a mush. This paste can be heated in the microwave for 15 seconds or heated in a water bath until the gelatin dissolves. Heat without bringing to a boil. The mass resembles jelly.
Now add 200 grams of powdered sugar to the jelly. in parts. It is better to sift the powder so that there are no lumps. And mix the mastic with a spoon. Gradually the mass will begin to thicken, you need to knead it with your hands.
As soon as the mastic stops sticking to your hands, it is ready. If suddenly the mastic begins to crumble, pour a little lemon juice into it. The juice will make it white, but also adds dryness to the mastic. Choose for yourself which is better. Now you can add any dye you want to the mastic.
The mastic can be stored in the refrigerator in a bag and used as needed - to decorate cakes and pastries.
Cake with fondant flowers
Ingredients:
- Flour 200 g;
- Eggs 8 pieces;
- Sugar 300 g;
- Syrup 200 ml;
- Butter cream 600 g.
For the cream under the mastic:
- Butter 150 g;
- Condensed milk 150 g.
For decoration:
- Mastic 400 g;
- Powdered sugar 100 g;
- Food coloring to taste.
Cooking method:
To decorate a birthday cake with roses you need: white mastic - you can make it yourself or buy it ready-made; powdered sugar - for working with mastic; molds for cutting out petals and leaves; toothpicks for fastening roses, a lemon fork, scissors, a brush; cake - you can decorate any cake in this way, always covered with mastic cream; water.
Roll out the mastic into a thin pancake, large enough to cover the cake. Carefully, so as not to damage the mastic, cover the cake with it. Use your fingers to create a drapery on the sides of the cake. In this way we imitate fabric. We will use the mastic scraps further.
Roll out a small pancake and add red dye. Knead the mastic to the required uniform color and roll it into a thin pancake. Using a round shape of the desired size, be it a glass or a special shape, cut out circles - these will be rose petals. For one rose you need 7 circles.
Flowers and leaves can be prepared a day or more in advance. Then the decorating process will be easier.
Wrap the first petal into a tube. We wrap the second petal around the first. Lubricate the petal with a little water. Do the same with the third - lubricate with water and wrap two petals. And so, petal by petal, we wrap it in a circle and make a rose.
In this way we make the number of roses required for decoration. The roses will turn out to be oblong, so we cut off the ends of the flowers with scissors. Knead the green mastic, roll it into a pancake and cut out leaves from it.
Using scissors, we make notches on each leaf like real rose leaves. Use a lemon fork to make veins on the leaves. Everything is ready, let the mastic dry a little. Once it dries, we begin to decorate. Brush the top of the cake with water.
We beautifully place roses on the cake. Decorate with leaves. We insert half a toothpick into the rosette, and use the toothpicks to attach the rosettes to the side of the cake.
Cake with roses made from fondant
Ingredients:
for biscuit:
- on a mold 26 cm;
- eggs - 6 pcs.;
- sugar - 200 g;
- flour - 250 g;
for cream:
- boiled condensed milk - 1 can;
- butter - 300 g.
- for the meringue:
- eggs - 4 pcs.;
- powdered sugar - 250 g;
- any nuts.
For decoration:
- white and pink mastic;
- oil cream for mastic.
Cooking method:
Fresh eggs and beat at high speed until thick foam. Then, continuing to beat, gradually add sugar and beat for 8 - 10 minutes. It is very important to sow the flour and gradually add it, stirring with a spatula from the bottom up, slowly. The dough turns out very airy.
Line the form with paper. Pour the dough starting not from the center but along the edges. Bake in a preheated oven for about 35 minutes at 200 degrees, do not open the oven for half an hour. Then you can check the readiness with a wooden skewer.
I place the finished hot biscuit on the board turning it upside down. Let it cool completely. It is better to bake the sponge cake a day or more before placing the cake. The cream is the simplest. Beat soft warm butter with a mixer and gradually stir in cold boiled condensed milk.
For the meringue, beat the whites of 4 eggs to a thick, stable foam, gradually stirring in the powdered sugar. Add finely chopped caramelized nuts, any you like. Heat the oven to 100 degrees. The meringue is not baked, but rather dries for 2 hours.
Cut the sponge cake into 3 parts, brush first with coffee and then with a layer of cream. Then a layer of meringue, then a layer of cream and again a sponge cake and so on again. Cover the top cake with buttercream, smooth it into mastic and put it in the refrigerator for an hour or two.
After a couple of hours, smooth out the cream again and cover with mastic, pressing it tightly onto the cake. Decorate with flowers. It is important to store the cake in the refrigerator without covering it with anything.
How to quickly prepare mastic
This homemade mastic turns out to be very elastic, does not crack when modeling and covering the cake, and is easily painted in both warm and cold shades.
Ingredients:
- 1 glass of cold water;
- 2 cups sugar;
- 25 g gelatin;
- 170 g invert syrup;
- 1⁄4 tsp. salt;
- 1200 g powdered sugar;
- 300 g starch;
- preparing mastic.
Cooking method:
First you need to add 1/2 cup of cold water to the gelatin. Next, sugar, salt, the remaining water and invert syrup need to be mixed, put on fire and, stirring, bring to a boil. After boiling, reduce the heat to low and cook for 8 minutes without stirring.
At the next stage, we will beat the mass with a mixer equipped with whisks for batter. With the mixer running, pour the boiling mixture into the gelatin and beat at maximum speed. You need to beat for a long time, until the mass triples.
It will become lush, uniform, shiny, white-white and begin to curl onto the corollas. It usually takes about 10-12 minutes to beat. It all depends on the power of the mixer.
The powder must be sifted through a fine sieve. And gradually, in 3-4 additions, add all the powder, stir until smooth. The output will be a dense snow-white mass.
Cover the container with almost finished mastic tightly with cling film. And leave at room temperature for a day. Then, using a spatula or spoon, you need to remove the resulting mass onto a table thickly sprinkled with starch and mix the mastic thoroughly.
Marshmallow mastic with chocolate
Ingredients:
- "Marshmallow" - 50 g;
- chocolate of any of 3 types;
- butter - 1 tbsp. l.;
- milk - 2 tbsp. l.;
- citric acid - a pinch;
- powdered sugar - 100 g.
Cooking method:
Break the chocolate bar into small pieces. Place in a bowl with Marshmallow, citric acid and milk, place in a water bath and melt. Never bring to a boil, remove the mixture from the heat when the chocolate begins to melt. Add oil and powder (gradually). Mix until thick.
Place the finished mastic on the table, first sprinkling it with powdered sugar. Knead until elastic structure. To obtain a rich chocolate color, you can add a tablespoon of cocoa powder, after sifting it to remove any lumps. This additive is added at the initial stages, along with the powder.
Homemade chocolate mastic
Ingredients:
- Powdered sugar - 200 g;
- Marshmallow - 150 g;
- Milk chocolate / Chocolate (white, milk, bitter - depending on the task) - 100 g;
- Water - 3 tsp;
- Butter;
- Potato starch (the whiter the better).
Cooking method:
Sift the powdered sugar and pour it into a bowl with a wide bottom. Pour 2 tsp into the bottom of the container with marshmallows. water (it will not stick to the dishes after melting), add 1 tsp to the chocolate. water and 1 tsp. butter.
Heating method - water bath or microwave - your choice. It is important not to overheat the chocolate, otherwise it will curdle. As soon as the chocolate flows, remove, stir, and rub the mixture into the bowl. So, the marshmallow has increased in size and become soft, turn it out onto the powdered sugar. Next is chocolate. Mix the mixture until smooth.
We grease the surface of the table and dump it out, scrape out the mastic with a spoon, grease our hands with oil and knead the mastic, stretch it. Wrap it in a plastic bag, tightly without access to air and in the refrigerator for 8 hours.
It is important not to overheat the chocolate mastic and not to roll it out in a very thin layer. As soon as the cake is processed and packed in mastic, we send it to the refrigerator. The chocolate will harden, weather and finally take shape. When the chocolate mastic hardens, it does not harden (you cannot knock on it) and does not become hard, thanks to the oil included in the composition.
Chocolate mastic with honey
Ingredients:
- 120 g – light honey;
- 230 g – chocolate.
Cooking method:
We take any chocolate, black, milk or white. Chop finely and transfer to a saucepan. Place in a water bath, stirring constantly until completely dissolved. After this, immediately pour in honey.
Stir with a wooden spatula until the mass comes off easily from the walls of the container. Place cling film on the work surface and the chocolate mixture on it. Flatten and wrap tightly.
Place in the refrigerator for 24 hours. Done, you can make jewelry. Before making, keep the mastic for 30 minutes at room temperature.
This chocolate mastic can be stored in the refrigerator for quite a long time - up to 3 weeks. Surprisingly, the longer it sits in the cold, the easier it is to work with! The consistency is very similar to plasticine.
How to properly cover a cake with sugar mastic?
In order to avoid unsightly folds on the sides of the cake, you need the following: roll out the sugar mastic with a small margin (about 5-10 cm) and so that this margin is maintained around the entire circumference. While covering the cake, the sugar mastic will stretch under its own weight and lie flat on it. After that, take a round pizza cutter and carefully cut off “all the excess.”
What to do if the base begins to show through from under the layer of mastic?
Most likely, it’s a matter of humidity: sugar mastic is very sensitive to it. Perhaps you did not comply with storage conditions or used a lot of impregnation. The finished cake must be stored in a tightly closed sealed box or in a plastic bag (and preferably for no more than 2 days).
What should the cake layer be like?
For the base, it is best to use dry biscuits or butter cakes. It is advisable to use buttercream or ganache. Souffle, cream, sour cream can sag under the weight of mastic or make the cakes moist and soft. After the cake is covered with cream, it must be refrigerated for several hours. Once the cream has hardened, the cake can be covered with sugar mastic. If the cream does not have time to completely harden, unsightly dents may form on the surface of the cake after coating with mastic.
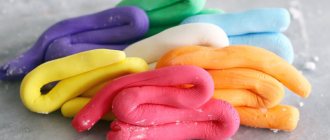
Jewelry Making for Beginners
Making fondant and the process of coating it on a cake is quite an exciting process. But it is no less interesting to decorate your work with various decorations. The prepared mass is like plasticine; you can mold unusual fragments and make flowers, bows, and colorful circles from them. The most important thing here is your imagination.
Making a flower. Take a ball of mastic, any color, and attach it to the base of the stick, lubricate it with water in advance and let it harden. Using special shapes, cut out the petals; make waves on the edges using a special stick that resembles a stick from a drum. Connect them to the ball, sticking them with water. Place the petals on top of each other. Allow the resulting result to dry.
If the flower is white, then it can be painted. Large parts must be done in advance and allowed to dry thoroughly. Decorations in the form of flowers or any other figures are placed on the cake some time before serving. If they are in the refrigerator for a long time, they can absorb moisture and lose their shape.